作者: admin

  • How to Style a Raised Bed Garden with Decorative Accessories for Year-Round Appeal
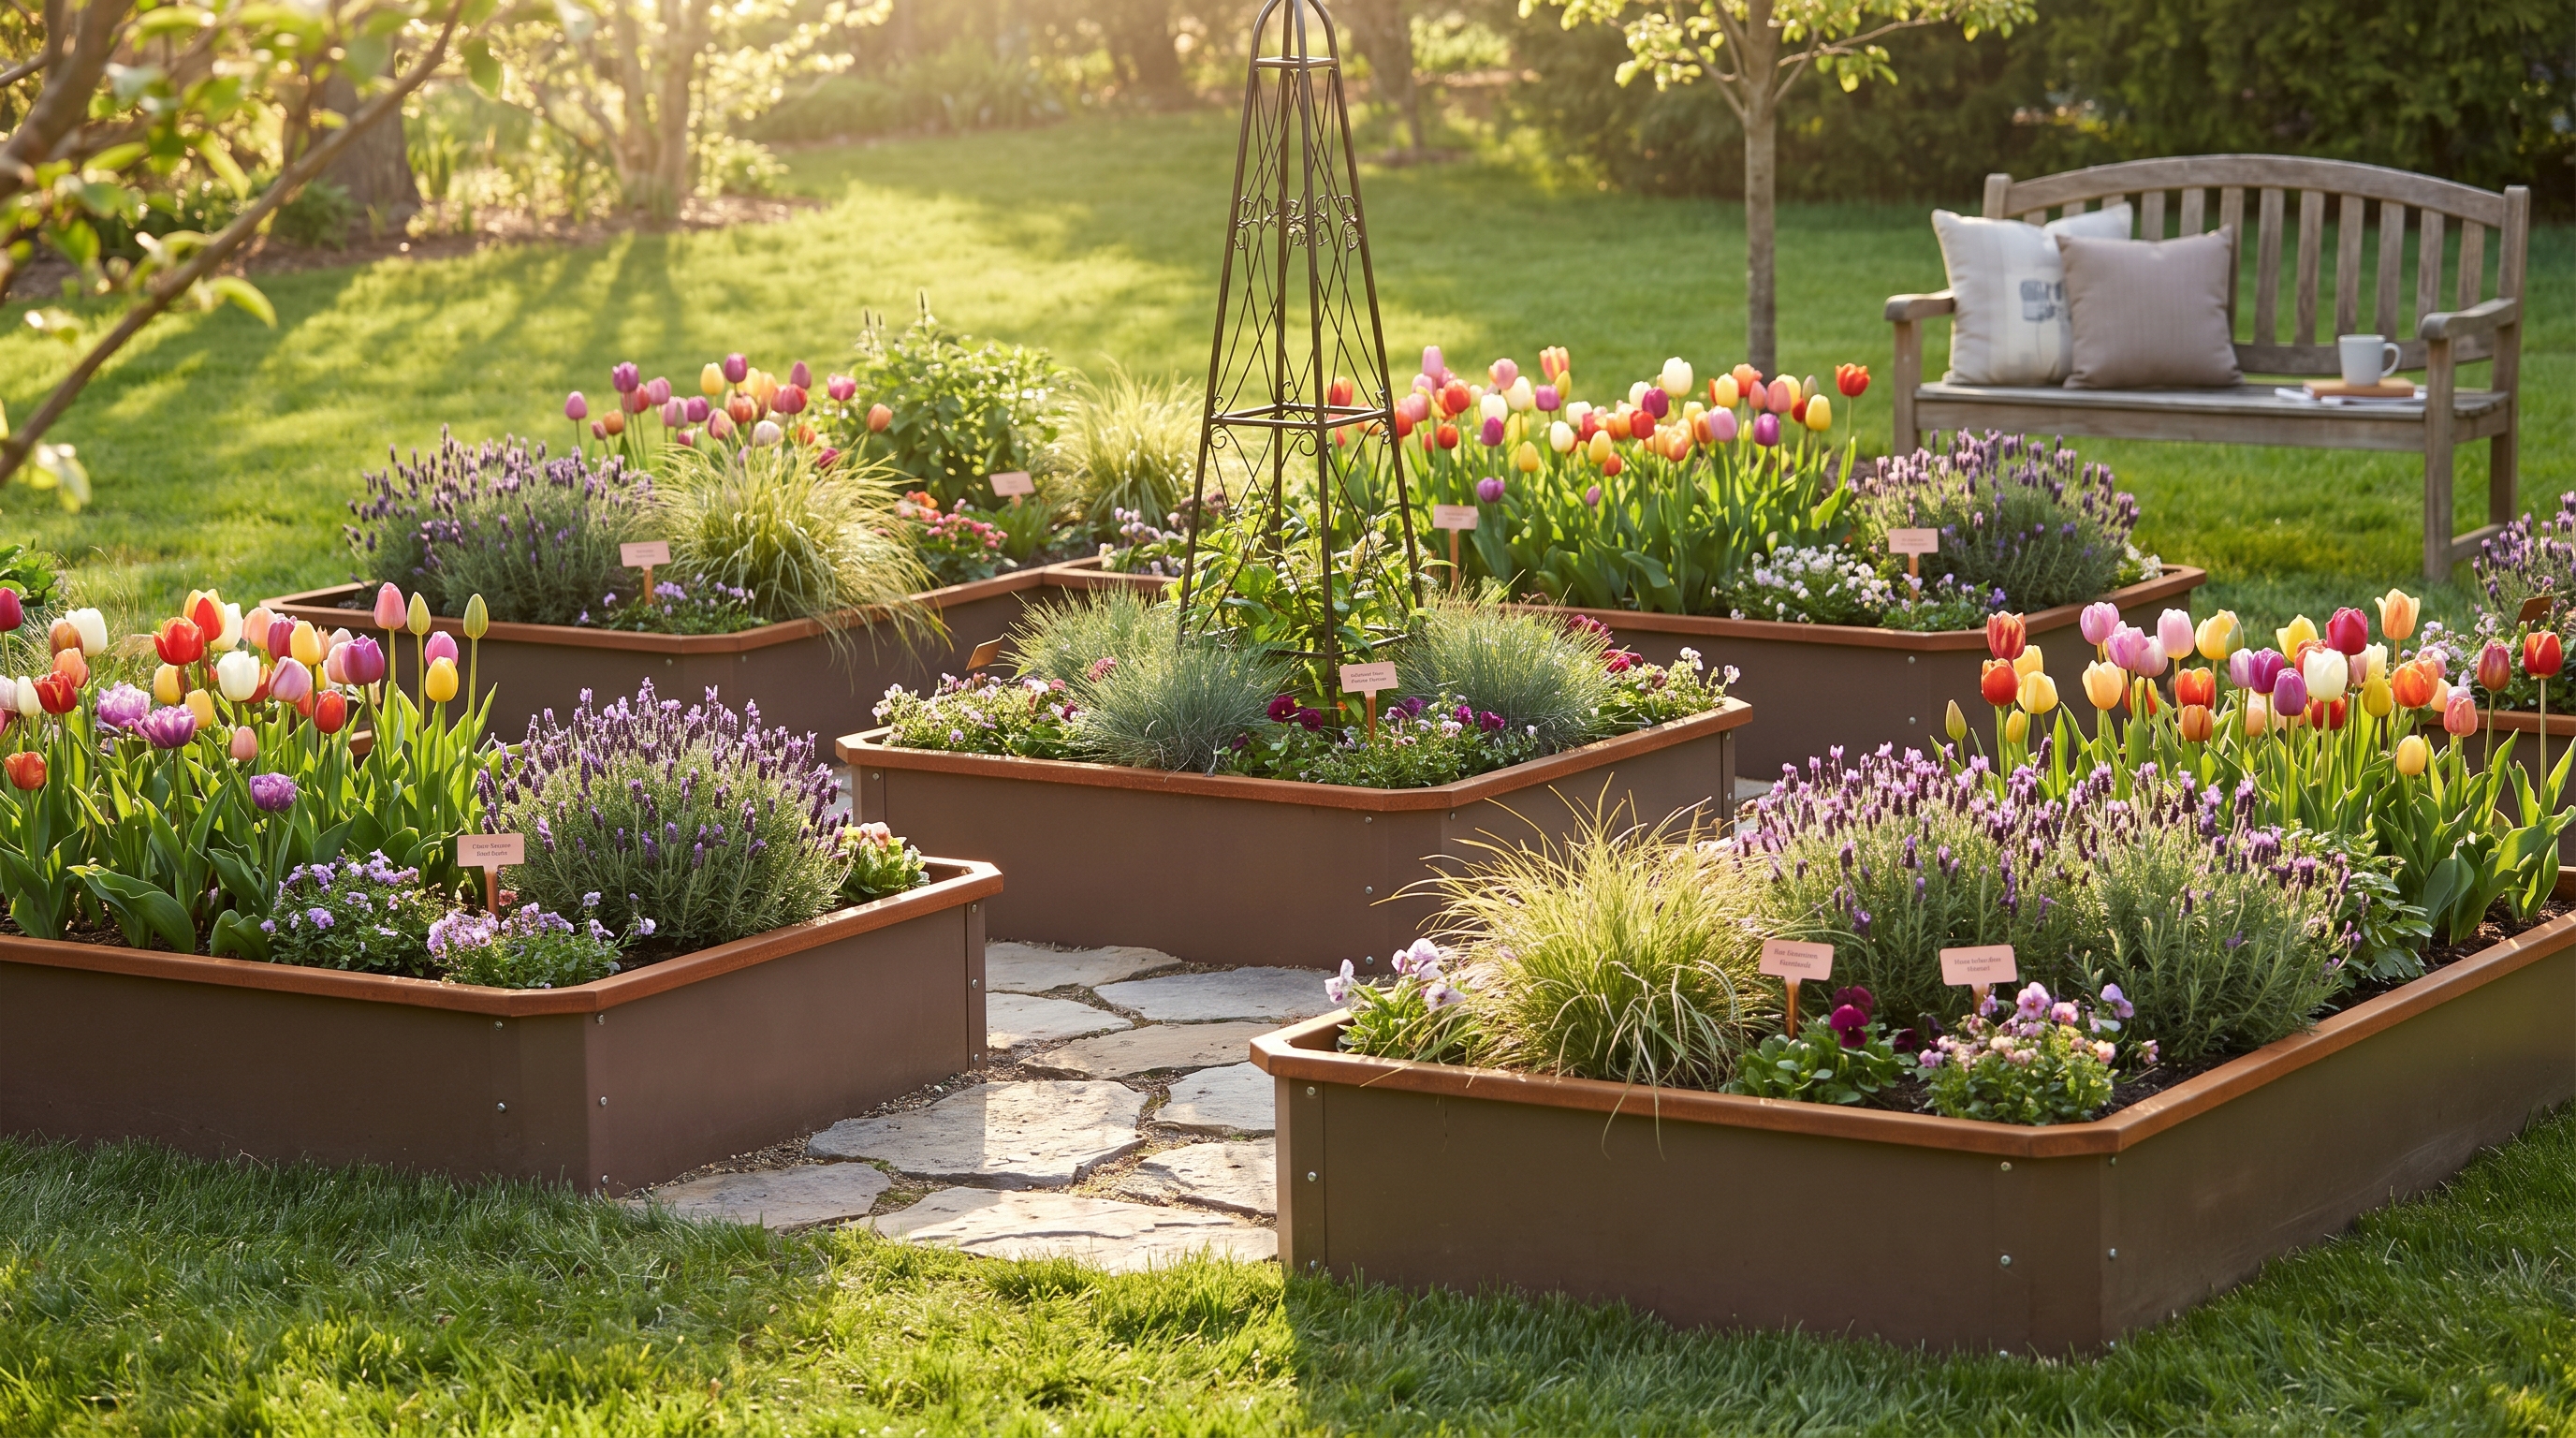
    A beautifully styled raised bed garden decorated with seasonal accessories, pathway stones, and blooming flowers for year-round curb appeal
    ALT: Styled raised bed garden with decorative accessories, seasonal flowers, and pathway systems for year-round visual appeal

    Transform Your Raised Bed Garden into a Living Landscape: Styling with Decorative Accessories for Every Season

    Key Conclusion: A thoughtfully styled raised bed garden layout can transcend pure productivity and become a genuine outdoor living feature. By layering decorative accessories—from pathway systems and border edging to seasonal planters and lighting—your raised bed planting layout achieves visual cohesion across all four seasons. The right raised bed layout balances structure, color, texture, and functional beauty, turning even the smallest backyard into a destination you’ll want to spend time in year-round.

    Gardening has evolved well beyond rows of vegetables and utilitarian planting boxes. Today’s home growers are as invested in how their gardens look as in what they produce. Whether you’re working with a compact urban patio or a sprawling suburban backyard, the way you style your raised bed garden dramatically affects curb appeal, personal enjoyment, and even property value.

    The good news? You don’t need a professional landscaper or an unlimited budget. With a clear design framework, the right structural foundation, and a rotating set of seasonal accessories, anyone can create a raised garden that looks intentional and inviting in January just as much as in July. This guide walks you through everything—from choosing your layout and materials to layering in the finishing touches that make your garden feel truly alive.


    Who This Guide Is For: Matching Your Styling Approach to Your Garden Situation

    ✅ Applicable Scenarios:

    • Homeowners with established raised beds looking to elevate aesthetics beyond basic planting
    • New gardeners building their first raised bed layout and wanting to plan for beauty from day one
    • Urban micro-gardeners working with limited space who want maximum visual impact per square foot
    • Empty nesters and retirees creating a peaceful, low-maintenance garden sanctuary they can enjoy daily
    • Eco-conscious growers who want a garden that looks polished without relying on constant replanting or heavy chemical inputs

    ❌ Not Applicable/Cautions:

    • Renters without permission to install permanent pathway systems or in-ground accessories—opt for container-based and removable décor instead
    • Gardeners in extreme climates (e.g., zones with heavy snowfall or year-round drought) who may need to prioritize climate-specific accessories before purely decorative ones
    • Anyone expecting overnight transformation—seasonal styling is a cumulative process that builds richness over multiple planting cycles

    Why Decorative Styling Is Now a Core Part of Raised Bed Garden Design

    For decades, raised bed gardening was primarily discussed in terms of drainage, soil depth, and crop yield. The beds themselves were tools—functional, efficient, and largely invisible once the plants took over. But something has shifted meaningfully in the past several years.

    Garden design platforms, lifestyle media, and a new generation of enthusiastic home growers have pushed the aesthetic dimension of kitchen gardens and ornamental food plots squarely into the mainstream. According to the National Gardening Association, participation in food gardening in the United States has grown substantially, with millions of households maintaining some form of home garden. And as more people invest more time in their outdoor spaces, the expectation naturally rises: gardens should be beautiful spaces, not just productive ones.

    This shift reflects broader trends in how people relate to their homes. Post-pandemic, outdoor living spaces became extensions of interior design sensibility. Patios, decks, and garden areas received the same attention to color palettes, material consistency, and furniture arrangement that living rooms once commanded. Raised beds—particularly those made from durable, visually appealing materials like galvanized steel—became design anchors rather than afterthoughts.

    The structural quality of your beds matters enormously here. A raised bed garden that’s built to last—like the range of galvanized steel and rust-resistant options from Anleolife, engineered for up to 20 years of service life—provides a stable, handsome framework onto which you can layer seasonal décor year after year without the bed itself degrading or looking worn. A bed that rusts, warps, or splinters within a few seasons undermines every styling effort you make on top of it.

    The design challenge, then, is this: how do you build a raised bed layout that serves as a flexible canvas, capable of looking equally compelling whether it’s planted with winter kale, spring tulips, summer tomatoes, or autumn ornamental grasses? The answer lies in thoughtful structure, smart accessory selection, and an understanding of seasonal design rhythm.


    The Complete Framework for Styling Your Raised Bed Garden with Decorative Accessories

    Three Steps to Get Started Quickly

    Step 1: Audit Your Current Layout and Identify Design Zones

    Before purchasing a single accessory, spend 20–30 minutes walking your garden space at different times of day. Take photos. Identify where pathways naturally form, where the eye travels first, and which areas feel visually cluttered or empty. Divide your space into three zones: the primary view (what you see from inside the home or main entrance), the working zone (where you actually garden), and the transitional edges (borders, corners, and paths). This audit takes less than an hour but prevents costly styling mistakes down the line.

    Step 2: Choose a Structural Theme and Color Palette

    Cohesion comes from consistency. Pick one material theme—natural wood, galvanized metal, terracotta, or stone—and carry it through your accessory choices. Then choose a color palette: soft neutrals with pops of seasonal color, or a bolder scheme anchored by your bed’s finish. For galvanized steel beds, cool silver tones pair beautifully with slate gray stepping stones, aged copper plant markers, and deep green or burgundy foliage. This step can be done with a simple mood board using clippings or a free design app before you spend any money.

    Step 3: Layer Accessories in Order—Structure First, Then Seasonal Accents

    Install permanent or semi-permanent structural elements first: pathway systems, edging, trellises, raised bed surrounds, and lighting infrastructure. These form the backbone of your design. Once these are in place, layer in seasonal accents—planters, décor stakes, seasonal wreaths for a potting shed, or temporary color pops like annual flowers at bed corners. Refreshing seasonal layers takes an afternoon and keeps your garden feeling current without rebuilding from scratch each year.


    Comparing Decorative Accessory Approaches: Structure, Season, and Style

    Different gardeners approach styling in different ways, and each approach has genuine merits depending on your goals, available time, and budget. Here’s how three common strategies compare:

    Comparison Dimension Structure-First Approach Seasonal Rotation Approach Integrated Ecosystem Approach
    Primary Goal Long-term visual cohesion Seasonal freshness and variety Complete garden-as-living-space
    Upfront Investment Higher (pathways, permanent edging, lighting) Lower (mostly seasonal plants and décor) Highest (combines structure + seasonal + functional zones)
    Maintenance Level Low once installed Moderate (regular seasonal swaps) Moderate to high initially, lower once established
    Best For Retirees, empty nesters, low-maintenance preference Enthusiastic gardeners who enjoy seasonal change Families, serious growers, lifestyle gardeners
    Visual Consistency Very high year-round Variable (looks best in peak season) High, with dynamic seasonal updates
    Flexibility Lower (permanent elements are fixed) High (easy to change direction) Medium-high (structure is fixed, accents flexible)
    Beds That Work Best Durable metal beds with clean lines Any bed type Long-lasting beds rated for 20+ years

    The integrated ecosystem approach, while requiring the most upfront planning, consistently produces the most satisfying results over time. Importantly, it aligns naturally with a garden that uses raised bed layout as the anchor—giving you a defined, high-quality structural base from which to build every other design decision.


    Deep Dive: Styling Each Season with Decorative Accessories

    Spring: Fresh Starts and Color-Forward Design

    Spring is the season when most gardeners feel the greatest creative energy, and your raised bed garden layout should reflect that energy with intention rather than impulse.

    Start with edging and border definition. As snow melts and bare soil reappears, clearly defined borders make even an empty garden look purposeful. Low stone edging, metal garden borders, or simple timber rails along pathways signal that this space is curated. Pair these with early-flowering bulbs planted at bed corners—daffodils, alliums, or hyacinths—that were installed the previous fall.

    Use vertical accessories to add height early. Spring is the time to install or refresh trellises, obelisks, and climbing supports before vigorous growth makes it difficult to position them. A decorative copper or painted iron obelisk in the center of a 4×4 bed doesn’t just support peas or sweet peas—it creates a focal point visible from the house, signaling that something beautiful is happening even before the plants fill in.

    Color temperature matters. Spring palettes tend toward cool and fresh—pale yellows, soft blues, lilac, and white. Choose seasonal planters and container accents in glazed ceramic or terracotta that echo these tones. Place them at pathway entrances or flanking a garden gate to draw the eye through the space.

    Summer: Abundance, Texture, and Living Color

    By summer, your raised beds are (hopefully) bursting, and the challenge shifts from making the space look active to making it look organized rather than overwhelming.

    Pathway systems earn their keep in summer. With regular watering, harvesting, and maintenance traffic, clearly laid stepping stones or gravel pathways prevent soil compaction and mud while adding a crisp, designed quality to the garden floor. Materials like natural flagstone, Belgian block, or large-format concrete pavers all work beautifully alongside galvanized steel beds. The visual contrast between the clean metal edges and the organic texture of stone creates a sophisticated, almost editorial look.

    Introduce living décor. Summer is ideal for incorporating companion planting as a styling strategy. Nasturtiums cascading over bed edges, ornamental basil planted in blocks for color, or tall bronze fennel used as a structural accent plant—all of these blur the line between decoration and cultivation in the most satisfying way.

    Add functional beauty with plant markers and labels. Handsome metal or ceramic plant markers aren’t just practical—they add texture and a handcrafted quality to the raised bed planting layout. Consistent markers in a single material (brushed copper, slate, or white porcelain) create visual rhythm across multiple beds.

    Fall: Warmth, Drama, and Transitional Styling

    Fall is arguably the most visually rewarding season for raised bed styling, because the warm tones of the season complement almost every garden material beautifully.

    Lean into ornamental grasses and late-season color. As food crops finish, replace them with ornamental kale, Swiss chard (which is as beautiful as it is edible), chrysanthemums, and grasses. These provide weeks of visual interest and often persist into early winter.

    Introduce harvest-themed accessories. Small decorative pumpkins and gourds at bed corners, dried corn tied to a trellis, or a simple wreath hung on a nearby shed or fence gate—these seasonal details create a festive, welcoming atmosphere without major investment or permanent commitment.

    Think about structure as the plants recede. As foliage dies back in late fall, the bones of your garden become visible: the beds themselves, the pathways, the edging, and any permanent structures. This is exactly why the quality of your raised bed material matters so much. A galvanized steel bed from Anleolife with its clean lines and durable finish remains a design asset even when empty—it doesn’t need plants to look good.

    Winter: Structure, Light, and Minimalist Beauty

    Many gardeners effectively abandon their outdoor spaces in winter, but a well-styled raised bed garden can be just as compelling under frost as in full bloom.

    Garden lighting transforms the winter garden. Solar-powered path lights, string lights strung between raised bed corners or along a fence line, or a simple lantern placed at a garden entrance—these create warmth and intimacy on dark evenings. In winter, when the garden is often seen primarily from indoors, lit pathways and glowing accents make the view from the kitchen window genuinely beautiful.

    Use structural accessories to create winter interest. Decorative metal stakes, sculptural elements, or a well-placed birdbath create focal points when there’s no foliage to do that work. A birdbath near your raised bed not only looks lovely dusted with frost—it also supports local bird populations that provide pest control throughout the growing season.

    Protect and showcase simultaneously. Cold-weather row covers and cloches, when chosen thoughtfully, can actually add visual interest—glass bell jars protecting overwintering herbs have a charming, heirloom quality that elevates the garden’s aesthetic even in January.
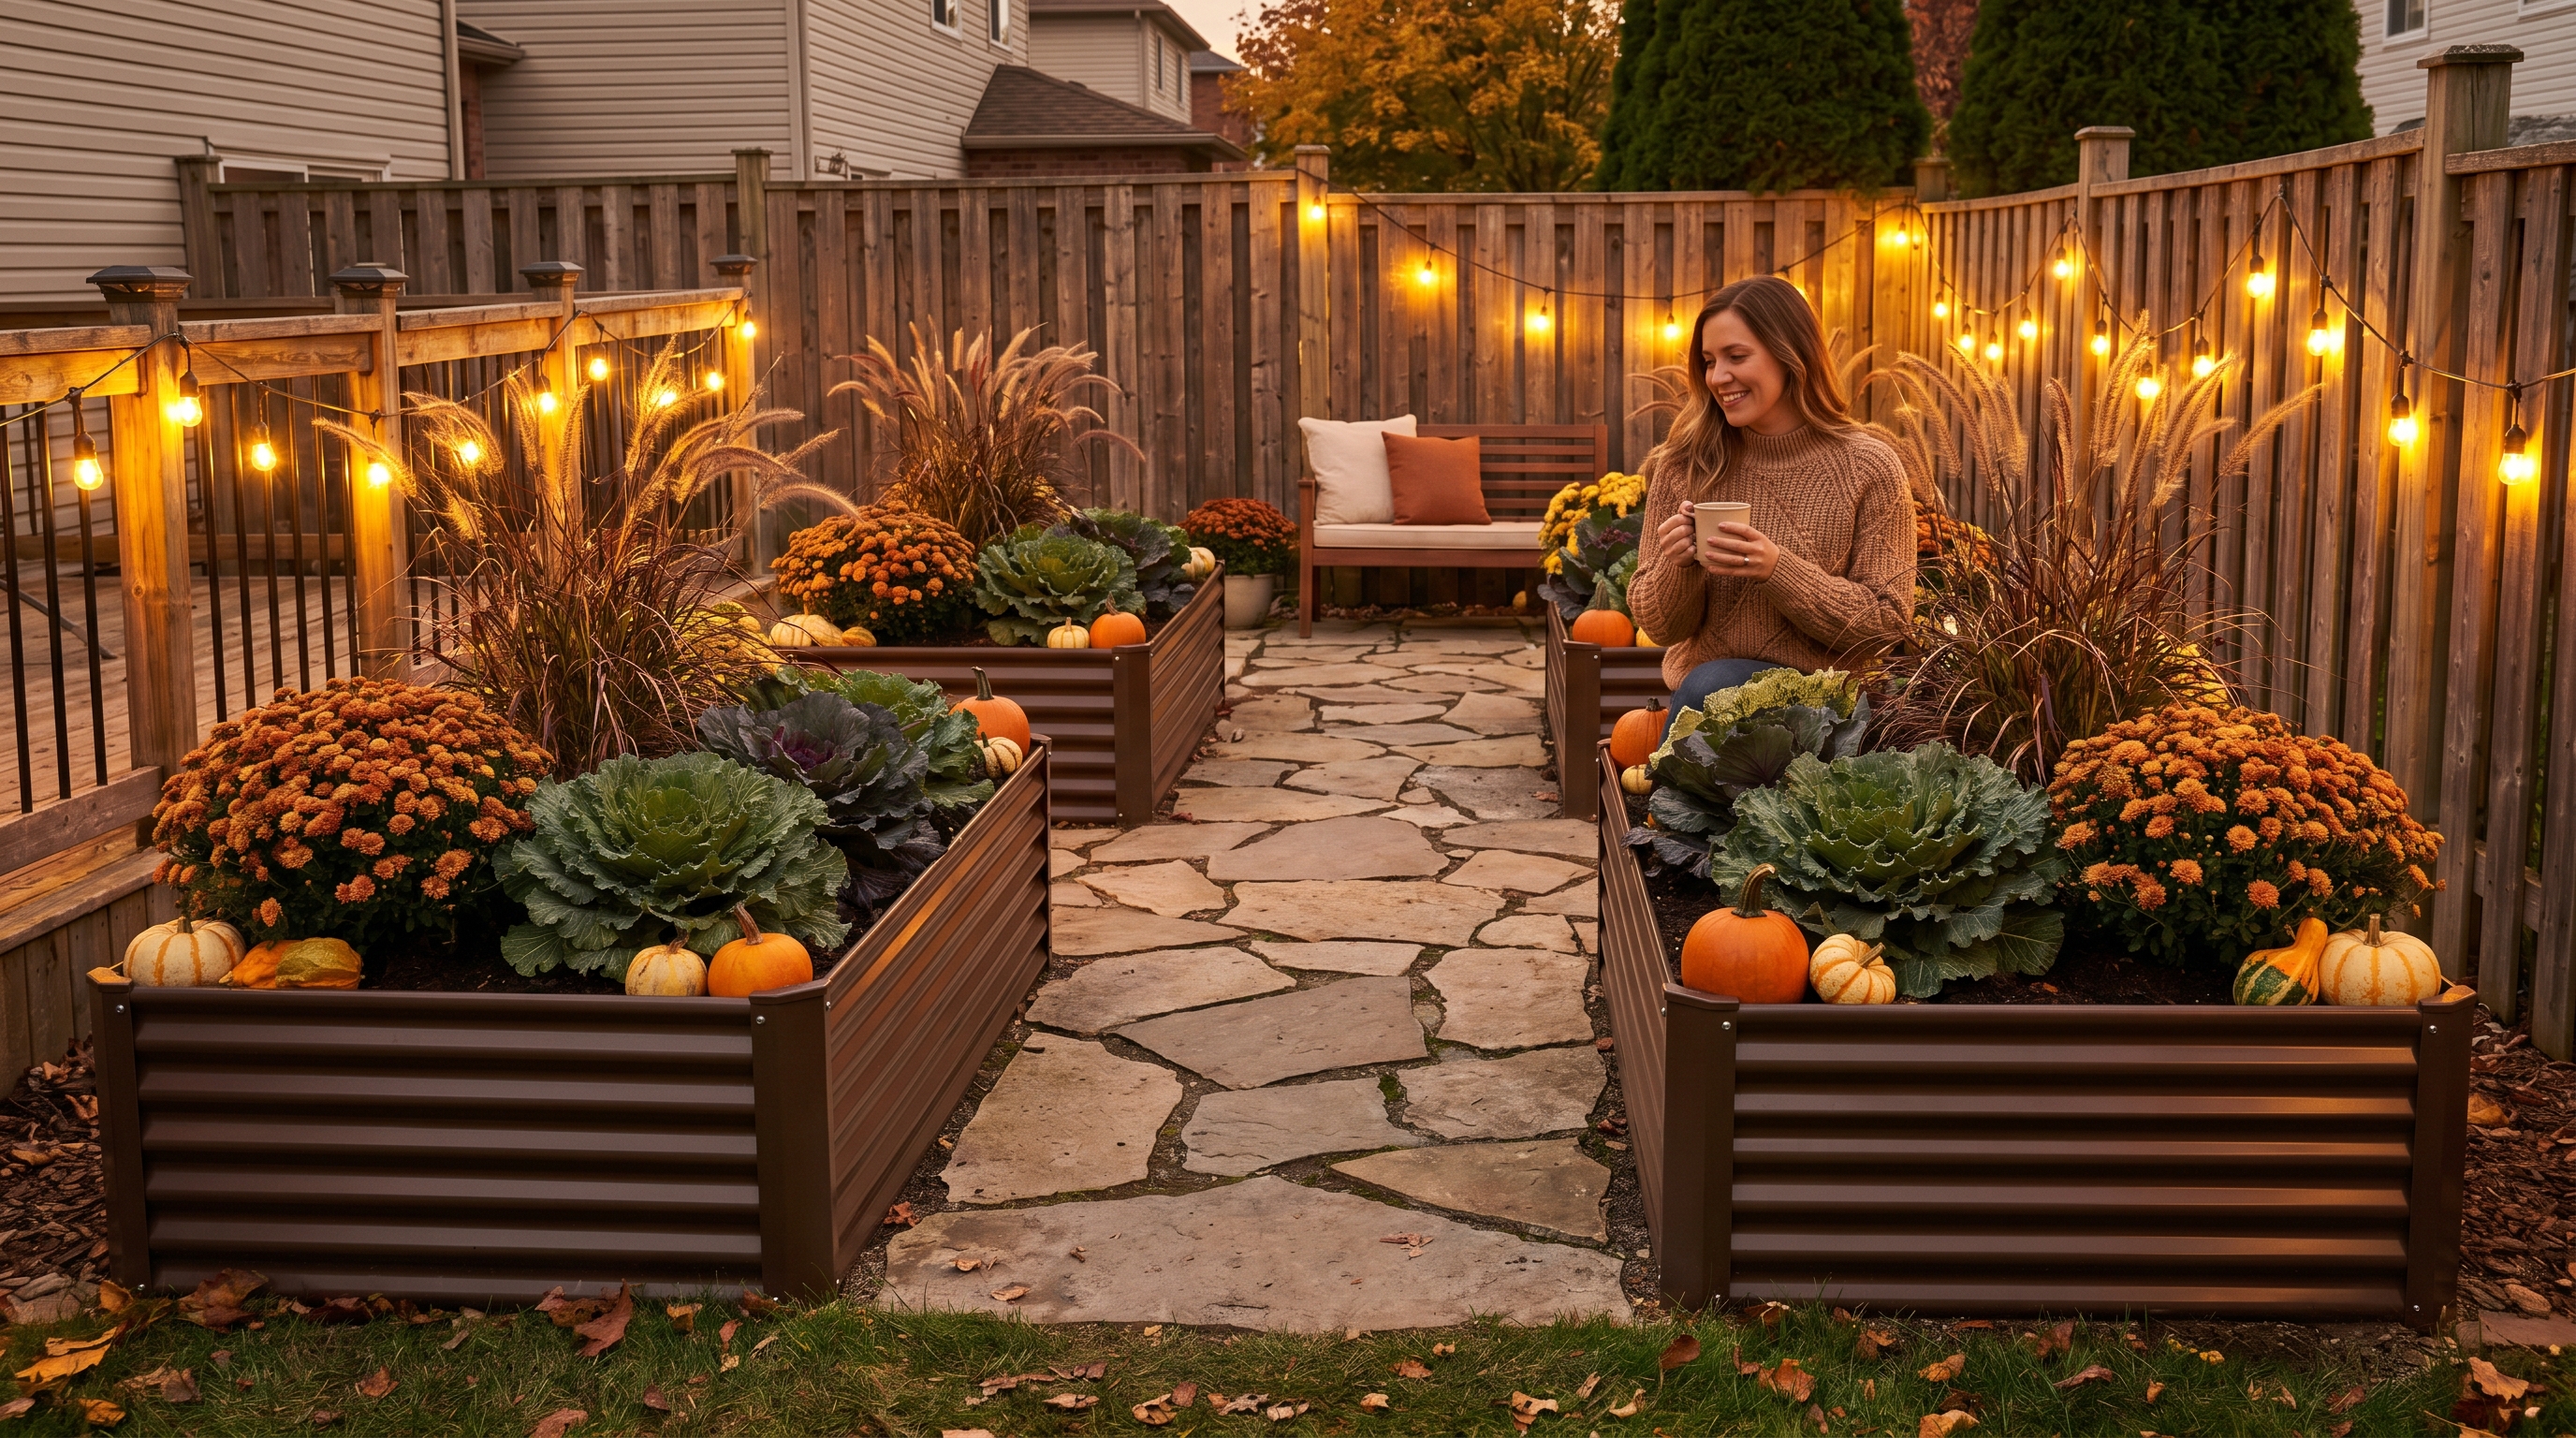
    A galvanized steel raised bed garden styled with seasonal fall décor, pathway stones, and warm string lights for a welcoming autumn atmosphere
    ALT: Galvanized steel raised bed garden with fall decorative accessories, stepping stone pathway, and warm lighting for year-round garden styling appeal


    Advanced Considerations: Cohesion, Scale, and Common Styling Mistakes

    Matching Accessory Scale to Bed Size

    One of the most common—and easily avoided—styling mistakes is using accessories that are out of scale with the beds themselves. A large ornamental urn that’s beautiful in a formal landscape can look overwhelming next to a compact 4×2 raised bed, while delicate garden stakes disappear visually beside a 12×3 or 8×4 bed. As a general principle, accessories should be proportional: their tallest dimension should relate to the bed’s footprint and height in a visually balanced way.

    Avoiding Material Overload

    Visual cohesion breaks down when too many materials compete for attention. If your beds are galvanized steel, your pathway is stone, and you add wooden trellises, ceramic planters, painted metal stakes, terracotta pots, and plastic seasonal décor, the result is chaotic rather than curated. Limit yourself to two or three primary materials throughout the space and rotate in seasonal color through plants and soft goods (cushions, fabric plant bags) rather than introducing new structural materials each season.

    The “Year-Round Skeleton” Principle

    Professional garden designers often talk about designing for winter first—if the garden looks good when bare, it will look extraordinary when planted. Apply this principle to your raised bed layout: install your pathways, permanent edging, lighting, and trellises, then assess how the space reads before planting anything. If it looks skeletal and incomplete even structurally, add more permanent interest. If it looks balanced and intentional, you’ve built an excellent foundation.

    Thinking About Raised Bed Height in Your Design

    Bed height dramatically affects how you interact with a space visually and physically. Shorter beds (around 18 inches tall) feel integrated with the landscape, while taller beds (24 to 30 inches and above, including Anleolife’s waist-high options) create a more architectural, raised-platform effect. Taller beds also make styling easier for gardeners with mobility considerations—and they create a natural visual separation that makes each bed feel like a distinct design “room” within the garden.


    Frequently Asked Questions FAQ

    Q1: How do I choose decorative accessories that look good across all four seasons?

    Focus on accessories that offer structural or textural interest independent of seasonal color—stone pathway elements, galvanized or copper metal accents, natural wood trellises, and quality lighting all look handsome year-round. Layer seasonal color through plants and temporary décor (wreaths, seasonal containers, ornamental produce displays) that can be swapped easily every few months. The key is that your permanent accessories form a cohesive “skeleton” that seasonal elements dress up, rather than carrying the full visual burden themselves.

    Q2: Are galvanized steel raised beds a good long-term base for decorative garden styling?

    Yes—galvanized steel beds are an excellent investment for any serious garden styling project. Their clean, architectural lines provide a neutral visual foundation that works with nearly every accessory style, from rustic farmhouse to modern minimalist. Anleolife’s galvanized steel raised beds are built for up to 20 years of service life, meaning your structural base remains attractive and consistent season after season. The durable finish also resists the weathering and discoloration that can make wooden beds look tired within just a few years.

    Q3: How long does it take and what does it cost to fully style a raised bed garden with seasonal accessories?

    The initial structural setup—pathways, edging, lighting, trellises—typically requires a weekend of work and represents the largest upfront investment. Seasonal updates (swapping plants, adding décor accents, refreshing containers) usually take just a few hours per season. Cost varies enormously based on bed size, material quality, and accessory choices, but many gardeners find they can build a cohesive, well-styled space incrementally over two to three seasons without requiring a single large expenditure.


    Summary

    Styling a raised bed garden for year-round appeal is genuinely achievable for any home gardener willing to approach it with a little intentionality. Three principles anchor everything:

    First, invest in a durable structural foundation. The quality of your raised beds—their material, finish, and longevity—determines how your entire garden ages. Beds built for decades, not seasons, give you a consistent canvas year after year.

    Second, layer accessories in order of permanence. Install pathway systems, edging, lighting, and trellises first. Let these structural elements establish the garden’s visual rhythm before adding seasonal accents.

    Third, design for every season, not just summer. A garden that looks intentional in February—through thoughtful lighting, structural accessories, and winter-interest plants—will look extraordinary in August.

    Whether you’re starting from scratch or refining an established space, the journey toward a beautifully styled raised bed garden is one of the most rewarding home projects you can undertake. Each season adds a new layer of richness, and each year the garden becomes more fully itself.

    Ready to Build the Garden You’ve Always Imagined?

    Nationwide U.S. warehouse network: Strategically located in California, Texas, Florida, New York, Illinois, and Washington to ensure delivery within 3–8 business days—so your garden upgrade plans never have to wait.

    Multi-channel sales network: Products are available on major e-commerce platforms including Amazon, Walmart, Home Depot, Lowe’s, and Wayfair, as well as the official website Anleolife.com, providing consistent quality assurance and after-sales service.

    Three core scenarios: Planting (metal raised garden beds, soil systems), Raising (chicken coops, rabbit hutches), and Beautification (decorative accessories, pathway systems), meeting complete needs from functionality to aesthetics.

    Upgrade your garden with Anleolife. We understand that an ideal garden is not built overnight, but gradually improved over time. Our modular product design allows flexible expansion based on your needs—from your first raised garden bed to a fully integrated planting-and-raising ecosystem. We grow with you every step of the way.


    References

    1. National Gardening Association. “Garden to Table: A Guide to Growing Food at Home”.
      https://garden.org
    2. University of Missouri Extension. “Raised Bed Gardening”.
      https://extension.missouri.edu/publications/g6985
    3. Colorado State University Extension. “Year-Round Gardening: Season Extension and Design Principles”.
      https://extension.colostate.edu/topic-areas/yard-garden/
    4. Royal Horticultural Society. “Garden Design: Creating Structure and Seasonal Interest”.
      https://www.rhs.org.uk/garden-design
    5. USDA Agricultural Research Service. “Home Gardening Resources and Best Practices”.
      https://www.ars.usda.gov

    Note: Standards and recommendations may be updated. Please check the latest official documents or consult professional advisors for current guidance.


    About Anleolife

    Anleolife is a leading outdoor garden solutions provider in North America, dedicated to offering a full-scenario product ecosystem for home gardening enthusiasts, covering planting, raising, and garden beautification. Since its founding, we have upheld our brand mission, “Made for Garden Life,” continuously innovating products and optimizing services to help hundreds of thousands of users upgrade their gardens, reconnect with nature, and enjoy a better garden lifestyle.

  • How to Level a Raised Garden Bed on Uneven Ground

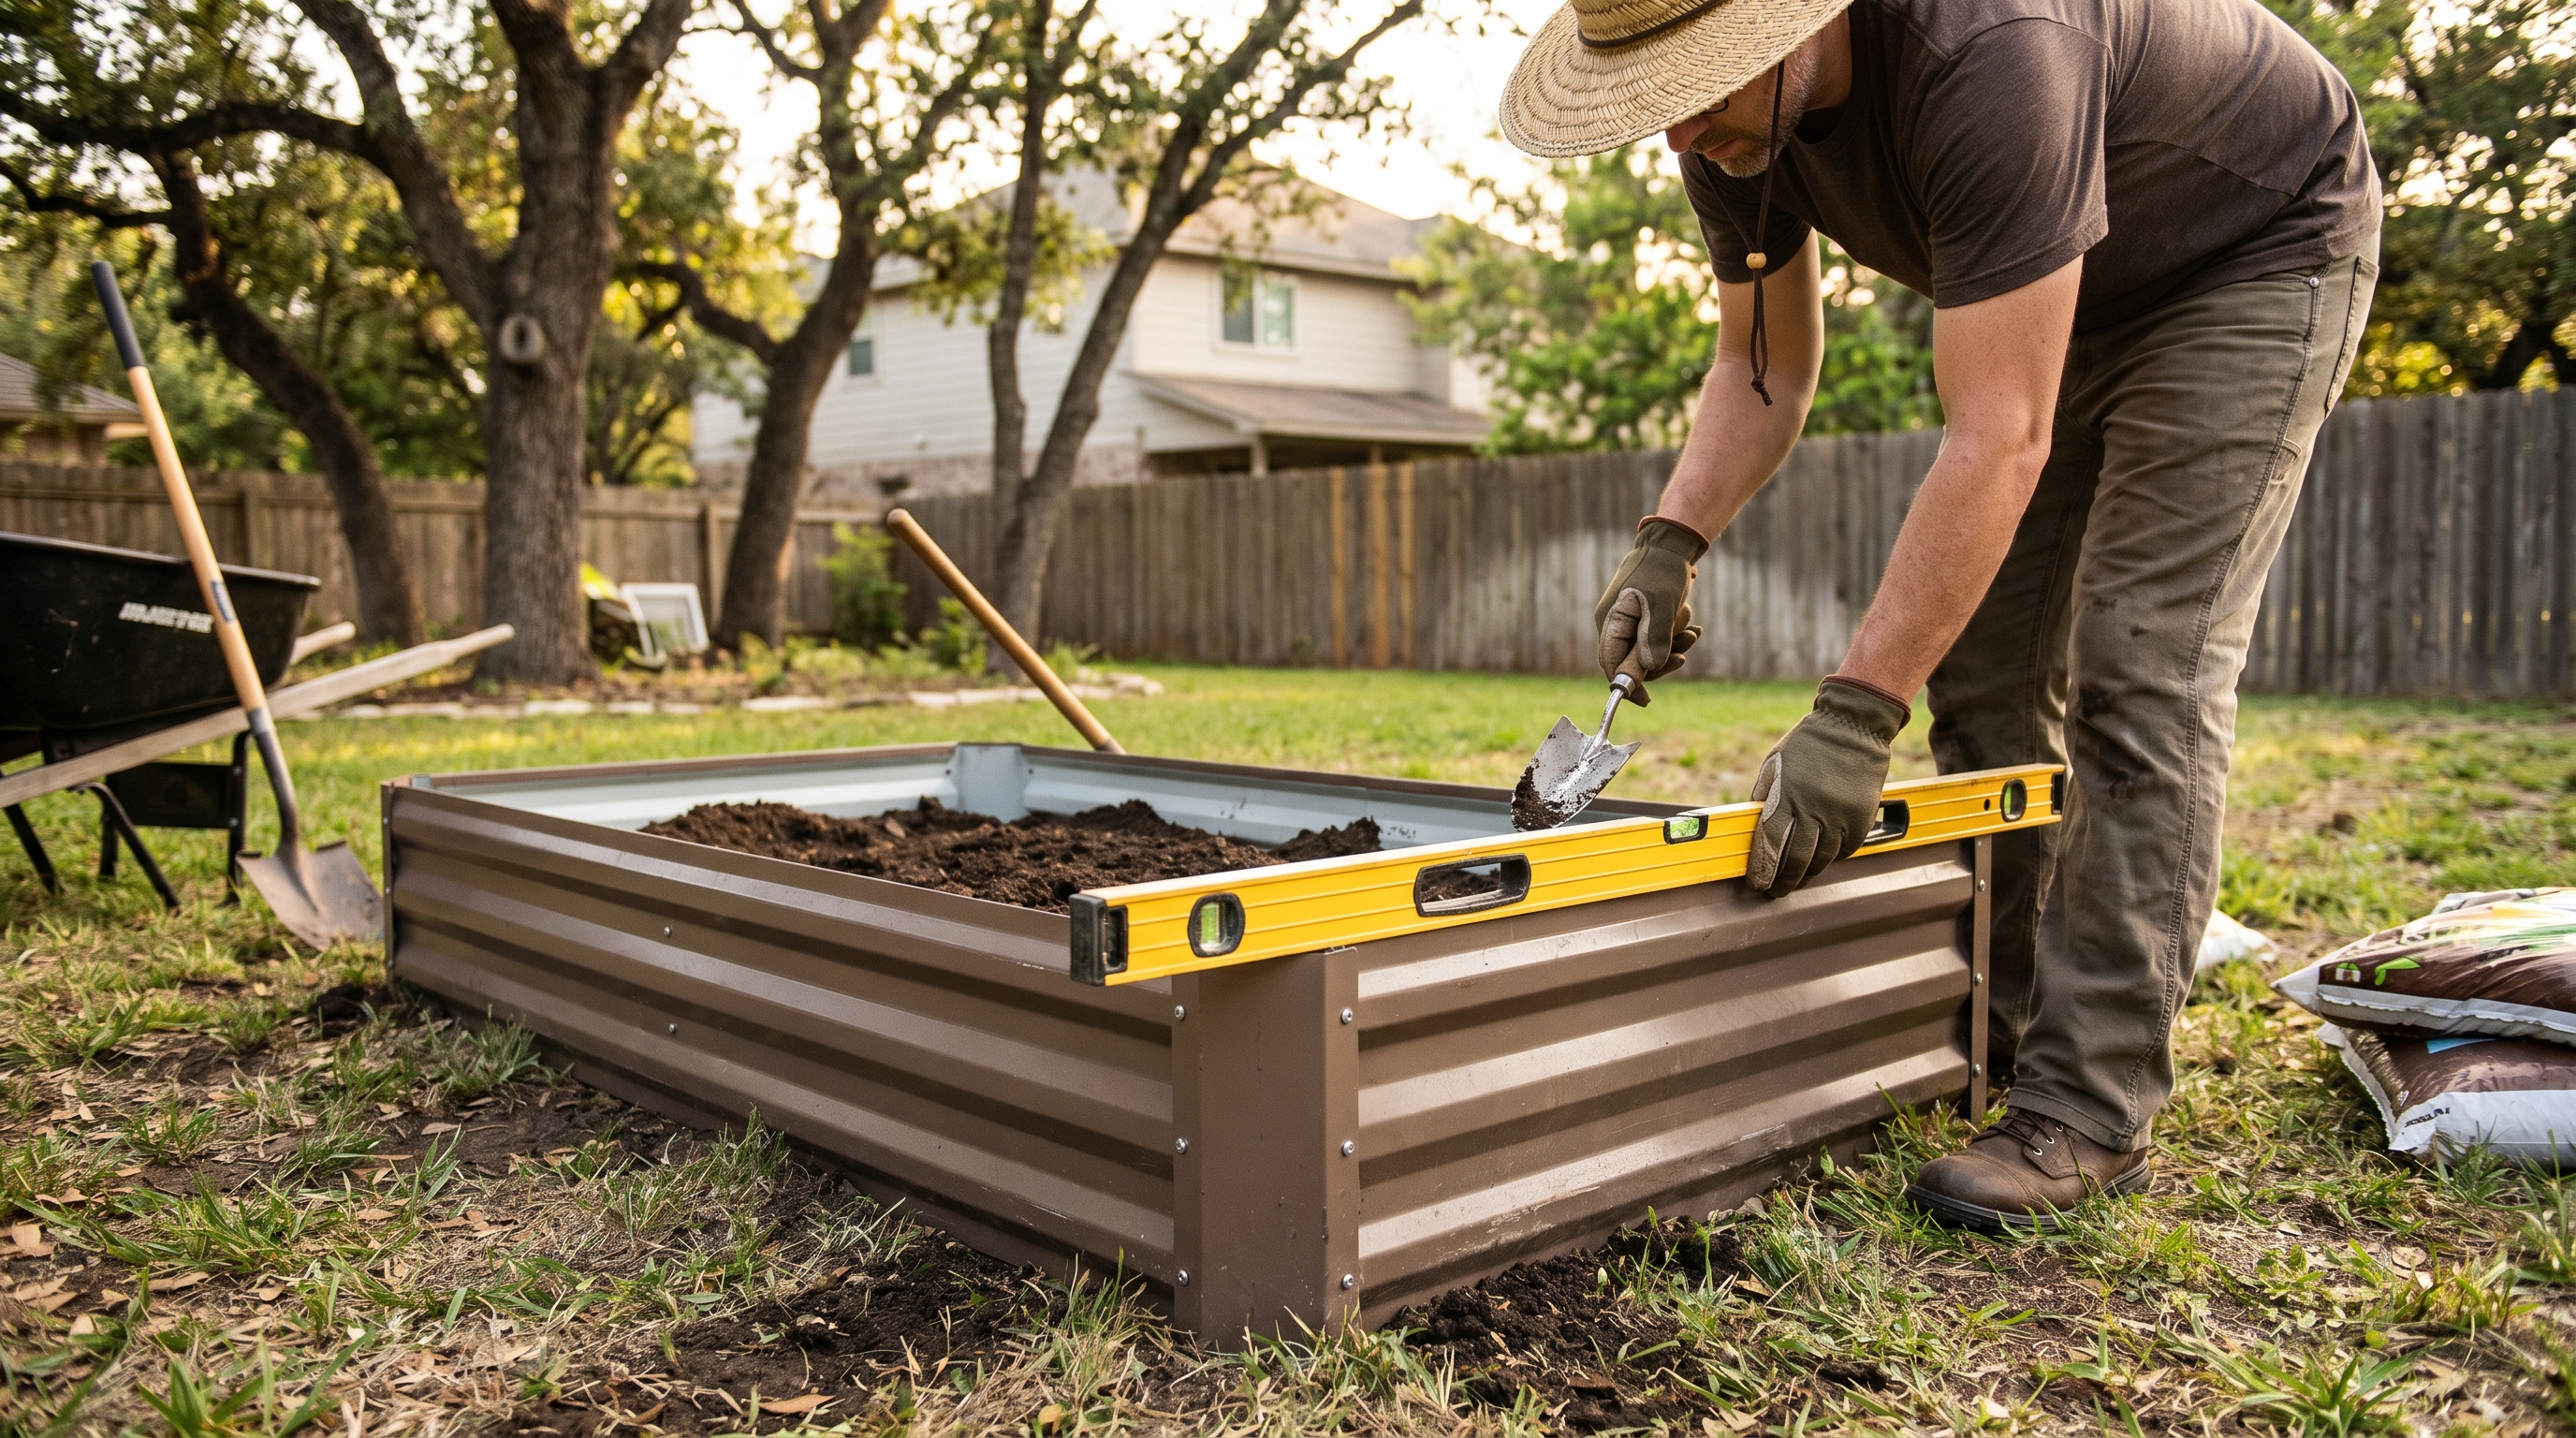
    A gardener leveling a raised garden bed on a sloped backyard with tools and soil visible
    ALT: Gardener leveling a metal raised garden bed on uneven ground in a residential backyard garden

    Why Leveling Your Raised Garden Bed on Uneven Ground Matters More Than You Think

    Key Conclusion: A properly leveled raised garden bed is the foundation of a productive, long-lasting garden. Whether you’re working with a gentle slope or genuinely uneven terrain, taking the time to level your raised bed garden layout correctly prevents water pooling, soil erosion, and structural instability. Getting this step right from the beginning protects your investment, improves plant health, and ensures your raised bed planting layout performs season after season for years to come.

    If you’ve ever set up a raised garden bed only to watch water drain off to one side, watch soil shift toward a corner, or notice your plants tilting at an odd angle, you already understand the real-world consequences of an unlevel bed. Leveling isn’t just an aesthetic concern—it directly affects drainage patterns, root development, and the structural integrity of the bed walls themselves. The good news is that leveling a raised garden bed on uneven ground is a manageable DIY task with the right approach, tools, and understanding of your specific terrain. Whether you’re a first-time gardener setting up your initial raised bed layout or an experienced grower expanding an established garden, this guide walks you through every practical step.


    Who This Guide Is For (and When Leveling Is Essential)

    ✅ Applicable Scenarios:

    • Homeowners installing raised garden beds on naturally sloped or rolling backyard terrain
    • Urban and suburban gardeners working with compacted, uneven soil or patchy lawns
    • Empty nesters or retirees converting yard space into productive kitchen gardens on imperfect ground
    • Gardeners upgrading from in-ground planting to a raised bed system on hillside or terraced yards
    • Anyone setting up taller or extra-tall raised beds where stability is critical

    ❌ Not Applicable/Cautions:

    • Beds installed on perfectly flat, pre-leveled concrete or patio surfaces (leveling work is already done)
    • Container gardening on balconies or elevated decks with adjustable platform systems
    • Slopes steeper than 30 degrees, where full terracing or retaining wall construction is a better structural solution than simple bed leveling
    • Situations where underground utility lines or tree roots are present—always check before digging

    Understanding Why Uneven Ground Is Such a Common Challenge for Raised Bed Gardeners

    Most residential yards in North America are anything but perfectly flat. Natural landscaping, grading for drainage, tree root systems, and decades of soil settling all contribute to terrain that looks manageable at a glance but reveals its complexity the moment you try to place a rectangular garden bed on it. According to the University of California Cooperative Extension, proper site preparation—including leveling—is one of the most important factors in raised bed performance and longevity.

    The challenge is compounded by the fact that raised garden beds come in many sizes and heights. A low-profile 18-inch bed on a mild slope may seem stable initially, but over a season of rain and watering, unlevel placement leads to predictable problems: uneven moisture distribution, concentrated soil compaction on the downhill side, accelerated wear on one wall of the bed frame, and in some cases, complete structural failure.

    For taller beds—those in the 24-inch to 35-inch extra-tall or waist-high range—the problem is even more pronounced. A taller column of soil exerts significantly more lateral pressure on the walls, and any tilt amplifies that force unevenly. This is why professional gardeners and landscape designers consistently emphasize leveling as a non-negotiable first step before filling a bed with soil.

    At Anleolife, we’ve designed our galvanized steel and rust-resistant raised garden beds to last up to 20 years, but even the most durable, well-engineered bed will underperform if it’s sitting on improperly prepared ground. The structural integrity of the frame, the drainage behavior of your soil mix, and the health of your plants all depend on that foundational level surface.

    The good news: leveling uneven ground for a raised garden bed doesn’t require heavy equipment or professional landscaping services in most cases. With the right knowledge, a few basic tools, and a methodical approach, it’s a project most gardeners can complete in a weekend afternoon.


    How to Level a Raised Garden Bed on Uneven Ground: Step-by-Step Solutions

    Three-Step Quick Start

    Step 1: Assess Your Terrain and Choose Your Leveling Strategy

    Before picking up a shovel, spend 15–20 minutes thoroughly evaluating your site. Use a long carpenter’s level or a line level and string to measure how much your ground varies across the footprint of your planned bed. Note whether the slope runs lengthwise, crosswise, or diagonally. Record the highest and lowest points—this measurement tells you whether you’re dealing with a minor correction (under 2 inches) or a more significant grade change that requires additional material or excavation. Your terrain assessment directly determines which of the three primary leveling methods you’ll use.

    Step 2: Prepare the Ground Using Your Chosen Method

    Once you know your slope, execute your leveling approach systematically. For minor slopes, this means cutting into the high side and building up the low side with compacted fill material. For moderate to significant slopes, you may need to create a tiered or stepped foundation using landscape timbers, gravel beds, or a combination of both. Always compact fill material in layers—never add more than 2–3 inches of loose material at a time before tamping. This prevents future settling that would re-create the uneven surface you just corrected. Plan for this step to take 1–3 hours depending on terrain severity.

    Step 3: Place, Check, and Anchor Your Raised Bed

    With your prepared surface ready, position your raised garden bed carefully. Use a bubble level across multiple points—both the long sides, the short sides, and corner-to-corner diagonals—to confirm true level in all directions. Make small adjustments by adding or removing material under specific points of the frame. Once level is confirmed, stake or anchor the bed according to the manufacturer’s recommendations, add your landscape fabric liner if desired, and begin filling with your soil mix in layers to avoid shifting the frame during fill.


    Comparing the Three Main Leveling Methods

    Different terrain conditions call for different solutions. Here’s a practical comparison of the three most common approaches gardeners use to level raised beds on uneven ground:

    Comparison Dimension Cut-and-Fill Method Gravel Base Method Stacked Frame/Riser Method
    Best For Mild to moderate slopes (1–4 inches variance) Moderate slopes with poor drainage Steep slopes or very uneven terrain
    Skill Level Required Beginner to intermediate Beginner Intermediate
    Primary Materials Soil, fill dirt, tamping tool Gravel, landscape fabric, level Additional frame sections or riser boards
    Drainage Performance Good if done correctly Excellent Excellent
    Time Investment 1–3 hours 2–4 hours 2–5 hours
    Cost Level Low Low to moderate Moderate
    Long-term Stability Good on compacted native soil Very good Very good to excellent
    Best Bed Height Range 18-inch standard beds All heights 24-inch and taller extra-tall beds

    Each of these methods can be used with any of Anleolife’s raised garden bed configurations, and in practice, many gardeners combine elements from multiple approaches for the best results.


    Detailed Method Breakdown: What to Actually Do on the Ground

    The Cut-and-Fill Method: Simple and Effective for Most Yards

    The cut-and-fill method is the most straightforward approach and works well for the majority of residential yards with gentle to moderate slopes. The core principle is simple: remove soil from the high side of your bed’s footprint and use it (or additional compactible fill material) to build up the low side until the entire footprint is level.

    Start by outlining the exact footprint of your bed using stakes and string. Use your line level to identify the highest corner—this becomes your reference point. All other points need to be raised to match this height. Dig down on the high side, removing topsoil carefully (you can reuse it in your bed later). On the low side, add fill material in 2–3 inch layers, tamping firmly with a hand tamper or plate compactor between each layer.

    One practical tip: use a long straight board (2×4 works well) laid across the footprint with a bubble level on top to check level repeatedly as you work. Checking at multiple angles—lengthwise, crosswise, and diagonally—ensures you catch any twist in the surface, not just one-directional slope.

    For Anleolife’s standard 18-inch raised beds in larger footprints like the 12×3 or 8×4 configurations, this method typically takes an afternoon and produces excellent results. The key is patience with the compaction process—rushing it leads to settling within the first growing season.

    The Gravel Base Method: Superior Drainage Meets Stability

    When your yard has both uneven terrain and known drainage challenges, the gravel base method solves two problems simultaneously. Rather than working exclusively with native soil, you excavate the entire bed footprint to a consistent depth (typically 4–6 inches below your lowest reference point), then fill this excavated area with compacted gravel to create a perfectly level, highly permeable base.

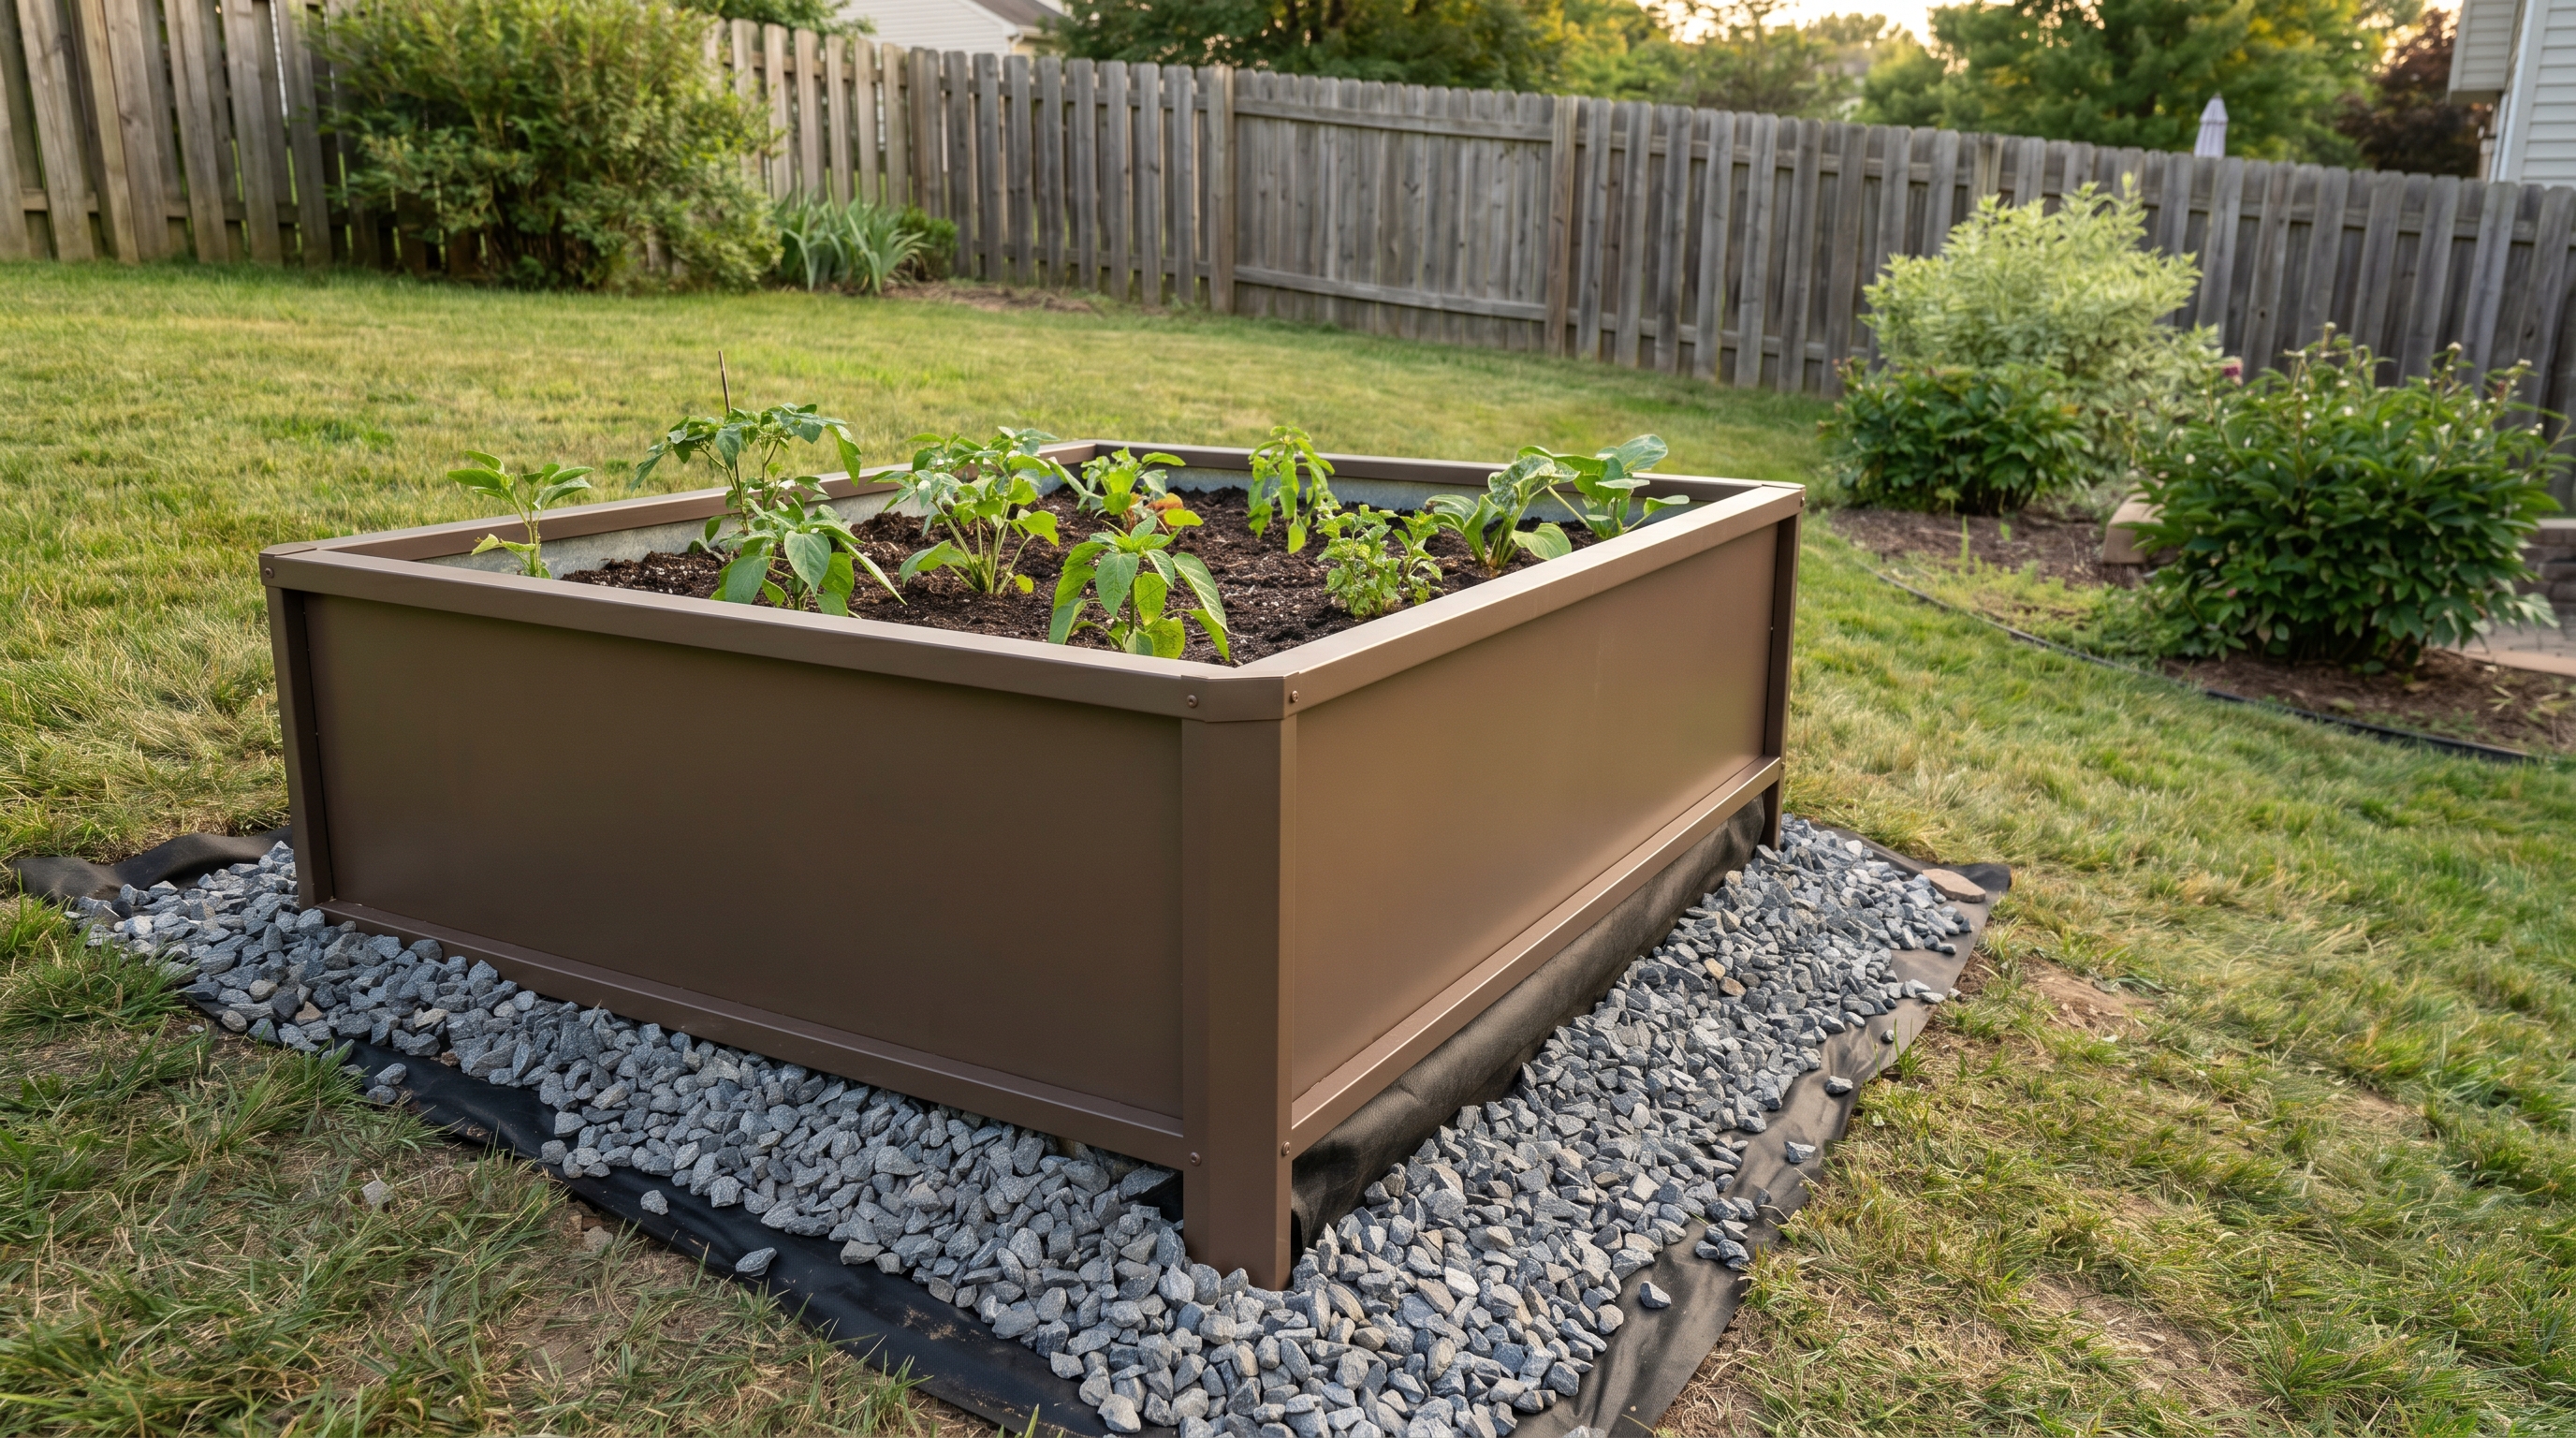
    Begin by excavating the footprint uniformly. Lay landscape fabric on the excavated floor to prevent weed intrusion and soil migration into the gravel layer. Add coarse gravel (3/4-inch crushed stone works well) in layers, checking level constantly with your board and bubble level. Once your gravel base is level and fully compacted, place your raised bed frame directly on top.

    This method is particularly well-suited to Anleolife’s taller beds—the 24-inch extra-tall and 30-inch extra-tall configurations—because the gravel base provides excellent drainage for the deeper root zones these beds support, while also creating a rock-solid, stable foundation. The gravel also naturally discourages burrowing pests from entering the bed from below.

    The Stacked Frame or Riser Method: Elegant Solutions for Challenging Terrain

    For more dramatic slope changes or genuinely challenging terrain, the stacked frame or riser method takes a different philosophical approach: instead of making the ground perfectly level, you adapt the bed’s foundation to accommodate the terrain while keeping the top of the bed level.

    In practice, this often means using landscape timbers, treated lumber, or concrete blocks on the downhill side to raise that edge of the frame until it matches the height of the uphill side. The frame itself sits level even if the ground underneath it isn’t. The cavity between the bottom of the raised frame section and the ground is typically filled with gravel for stability and drainage.

    This approach works beautifully on terraced hillside gardens and is frequently used by empty nesters and retirees who want to establish productive garden areas on sloped properties without undertaking major landscaping projects. It also pairs naturally with Anleolife’s modular raised garden bed systems, which are designed with flexibility in mind, allowing gardeners to configure and expand their growing space as their needs evolve.

    Raised metal garden bed installed level on a sloped backyard with gravel base and landscape fabric visible
    ALT: Galvanized steel raised garden bed installed level on uneven sloped ground using gravel base leveling method in a residential backyard garden


    Advanced Considerations: Handling Special Situations and Common Misconceptions

    When Your Slope Is Steeper Than Expected

    If you discover mid-project that your slope is more significant than initial assessment suggested, don’t push through with an inadequate solution. For slopes where the variance across the bed footprint exceeds 6 inches, consider splitting your planned footprint into two separate beds arranged as a stair-step terrace rather than one large level bed. This distributes the engineering challenge and often results in a more visually attractive, practical garden design. Anleolife’s modular raised garden bed configurations are well-suited to this kind of adaptive arrangement.

    Handling Soft or Waterlogged Soil

    Soft, waterlogged soil presents a special challenge because compacted fill material can settle significantly after wet weather. In these situations, it’s worth digging down to find more stable subsoil or using a gravel base of greater depth—sometimes 8 inches or more—before placing your bed frame. Adding a layer of coarse sand between native soil and gravel also improves load-bearing stability in high-moisture environments.

    The Most Common Leveling Misconception: “Close Enough” Is Enough

    Many first-time raised bed gardeners assume that a slight tilt—say, half an inch across an 8-foot bed—is negligible. In the first season, it often is. But over time, that small variance concentrates water runoff consistently to one end, causes uneven soil settling, and places chronic one-sided stress on the bed’s frame joints. Over the 20-year lifespan of a well-built bed like those in Anleolife’s lineup, the cumulative effect of even a modest tilt can be significant. Taking an extra 30 minutes to get truly level at installation pays dividends for years.

    After Leveling: What Comes Next

    Once your bed is level, secure it appropriately. Drive included stakes or anchoring hardware into the ground at the corners and along long sides to prevent frame movement during soil expansion from watering. Add landscape fabric or hardware cloth to the base if pest pressure is a concern in your area. Fill with your chosen soil mix in stages rather than all at once, pausing to check level after each major addition. Soil weight can shift a frame on freshly prepared ground if added too quickly.


    Frequently Asked Questions FAQ

    Q1: How do I know if my raised garden bed is level enough before filling it with soil?

    Use a 4-foot or longer carpenter’s level laid across the top rail of your bed in multiple directions—along both long sides, both short sides, and diagonally corner to corner. A reading within 1/8 inch across the full length of the bed is generally considered level for garden purposes. If you’re working with a longer bed (8 feet or more), use a line level and string stretched taut across the corners for more accurate measurement over a greater distance. Always check in at least three directions to detect any twist or warp in the frame placement.

    Q2: Is it necessary to remove grass and weeds before installing a raised garden bed on uneven ground?

    Yes, removing existing vegetation before leveling and installation is strongly recommended. Grass and weeds left under a raised bed will decompose unevenly, causing settling that disrupts your level surface over time. They can also push through into your bed. Either remove vegetation manually with a sod cutter, smother it with cardboard (the lasagna gardening method) well in advance of installation, or use a non-residual herbicide according to label instructions. Cardboard smothering is the preferred eco-friendly approach and aligns well with the values of most health-oriented home growers.

    Q3: How long does it take to properly level ground for a raised garden bed, and how much does it cost?

    For a standard 8×4 raised bed on a gentle slope, budget approximately 2–4 hours for site preparation and leveling using the cut-and-fill or gravel base method. Material costs are typically low—primarily gravel (if using), landscape fabric, and any additional fill dirt needed, usually totaling $20–$60 depending on your local market and the severity of the slope. More dramatic terrain corrections with retaining elements may take a full day and cost more. Investing this time and modest budget upfront protects a bed that’s built to last 20 years.


    Summary

    Leveling a raised garden bed on uneven ground isn’t glamorous work, but it is genuinely foundational work that determines how well your garden performs for years to come. Getting it right comes down to three core principles.

    First, assess before you act. Measure your slope carefully across the full footprint of your planned bed before committing to a leveling strategy. A small variance calls for a different solution than a significant grade change, and knowing the difference saves time and effort.

    Second, choose the right method for your terrain. The cut-and-fill method is efficient for mild slopes, the gravel base method excels where drainage is also a concern, and the stacked frame or riser approach handles more dramatic terrain beautifully. Don’t try to force one method onto terrain that calls for another.

    Third, prioritize true level, not close enough. Taking the time to achieve genuine level at installation—checking in multiple directions, compacting fill material properly, and anchoring the frame before filling—protects both the structural integrity of your bed and the health of your plants over the long growing seasons ahead.

    Your raised garden bed is an investment in fresh food, outdoor wellbeing, and the quality of your home environment. Give it the foundation it deserves.


    Start Growing with Confidence — Anleolife Has You Covered

    Nationwide U.S. warehouse network: Strategically located in California, Texas, Florida, New York, Illinois, and Washington to ensure delivery within 3–8 business days—so your garden upgrade plans never have to wait.

    Multi-channel sales network: Products are available on major e-commerce platforms including Amazon, Walmart, Home Depot, Lowe’s, and Wayfair, as well as the official website Anleolife.com, providing consistent quality assurance and after-sales service.

    Three core scenarios: Planting (metal raised garden beds, soil systems), Raising (chicken coops, rabbit hutches), and Beautification (decorative accessories, pathway systems)—meeting complete needs from functionality to aesthetics.

    Upgrade your garden with Anleolife. We understand that an ideal garden is not built overnight, but gradually improved over time. Our modular product design allows flexible expansion based on your needs—from your first raised garden bed to a fully integrated planting-and-raising ecosystem. We grow with you every step of the way.


    References

    1. University of California Cooperative Extension. “Building Raised Bed Gardens”.
      https://ucanr.edu/sites/MarinMG/files/303388.pdf
    2. Oregon State University Extension Service. “Raised Bed Gardening”.
      https://extension.oregonstate.edu/gardening/techniques/raised-bed-gardening
    3. University of Minnesota Extension. “Raised Bed Gardening for Vegetables”.
      https://extension.umn.edu/how/raised-bed-gardening
    4. National Gardening Association. “Raised Bed Gardening Guide”.
      https://garden.org/learn/articles/view/318/
    5. Penn State Extension. “Site Selection and Preparation for Home Gardens”.
      https://extension.psu.edu/site-selection-and-preparation-for-home-gardens

    Note: Standards and best practices may be updated over time. Please check the latest official documents or consult professional advisors for the most current guidance.


    About Anleolife

    Anleolife is a leading outdoor garden solutions provider in North America, dedicated to offering a full-scenario product ecosystem for home gardening enthusiasts, covering planting, raising, and garden beautification. Since its founding, we have upheld our brand mission, “Made for Garden Life,” continuously innovating products and optimizing services to help hundreds of thousands of users upgrade their gardens, reconnect with nature, and enjoy a better garden lifestyle.


  • How to Level a Raised Garden Bed on Uneven Ground

    A gardener leveling a raised garden bed on a sloped backyard with tools and soil visible
    ALT: Gardener leveling a metal raised garden bed on uneven ground in a residential backyard garden

    Why Leveling Your Raised Garden Bed on Uneven Ground Matters More Than You Think

    Key Conclusion: A properly leveled raised garden bed is the foundation of a productive, long-lasting garden. Whether you’re working with a gentle slope or genuinely uneven terrain, taking the time to level your raised bed garden layout correctly prevents water pooling, soil erosion, and structural instability. Getting this step right from the beginning protects your investment, improves plant health, and ensures your raised bed planting layout performs season after season for years to come.

    If you’ve ever set up a raised garden bed only to watch water drain off to one side, watch soil shift toward a corner, or notice your plants tilting at an odd angle, you already understand the real-world consequences of an unlevel bed. Leveling isn’t just an aesthetic concern—it directly affects drainage patterns, root development, and the structural integrity of the bed walls themselves. The good news is that leveling a raised garden bed on uneven ground is a manageable DIY task with the right approach, tools, and understanding of your specific terrain. Whether you’re a first-time gardener setting up your initial raised bed layout or an experienced grower expanding an established garden, this guide walks you through every practical step.


    Who This Guide Is For (and When Leveling Is Essential)

    ✅ Applicable Scenarios:

    • Homeowners installing raised garden beds on naturally sloped or rolling backyard terrain
    • Urban and suburban gardeners working with compacted, uneven soil or patchy lawns
    • Empty nesters or retirees converting yard space into productive kitchen gardens on imperfect ground
    • Gardeners upgrading from in-ground planting to a raised bed system on hillside or terraced yards
    • Anyone setting up taller or extra-tall raised beds where stability is critical

    ❌ Not Applicable/Cautions:

    • Beds installed on perfectly flat, pre-leveled concrete or patio surfaces (leveling work is already done)
    • Container gardening on balconies or elevated decks with adjustable platform systems
    • Slopes steeper than 30 degrees, where full terracing or retaining wall construction is a better structural solution than simple bed leveling
    • Situations where underground utility lines or tree roots are present—always check before digging

    Understanding Why Uneven Ground Is Such a Common Challenge for Raised Bed Gardeners

    Most residential yards in North America are anything but perfectly flat. Natural landscaping, grading for drainage, tree root systems, and decades of soil settling all contribute to terrain that looks manageable at a glance but reveals its complexity the moment you try to place a rectangular garden bed on it. According to the University of California Cooperative Extension, proper site preparation—including leveling—is one of the most important factors in raised bed performance and longevity.

    The challenge is compounded by the fact that raised garden beds come in many sizes and heights. A low-profile 18-inch bed on a mild slope may seem stable initially, but over a season of rain and watering, unlevel placement leads to predictable problems: uneven moisture distribution, concentrated soil compaction on the downhill side, accelerated wear on one wall of the bed frame, and in some cases, complete structural failure.

    For taller beds—those in the 24-inch to 35-inch extra-tall or waist-high range—the problem is even more pronounced. A taller column of soil exerts significantly more lateral pressure on the walls, and any tilt amplifies that force unevenly. This is why professional gardeners and landscape designers consistently emphasize leveling as a non-negotiable first step before filling a bed with soil.

    At Anleolife, we’ve designed our galvanized steel and rust-resistant raised garden beds to last up to 20 years, but even the most durable, well-engineered bed will underperform if it’s sitting on improperly prepared ground. The structural integrity of the frame, the drainage behavior of your soil mix, and the health of your plants all depend on that foundational level surface.

    The good news: leveling uneven ground for a raised garden bed doesn’t require heavy equipment or professional landscaping services in most cases. With the right knowledge, a few basic tools, and a methodical approach, it’s a project most gardeners can complete in a weekend afternoon.


    How to Level a Raised Garden Bed on Uneven Ground: Step-by-Step Solutions

    Three-Step Quick Start

    Step 1: Assess Your Terrain and Choose Your Leveling Strategy

    Before picking up a shovel, spend 15–20 minutes thoroughly evaluating your site. Use a long carpenter’s level or a line level and string to measure how much your ground varies across the footprint of your planned bed. Note whether the slope runs lengthwise, crosswise, or diagonally. Record the highest and lowest points—this measurement tells you whether you’re dealing with a minor correction (under 2 inches) or a more significant grade change that requires additional material or excavation. Your terrain assessment directly determines which of the three primary leveling methods you’ll use.

    Step 2: Prepare the Ground Using Your Chosen Method

    Once you know your slope, execute your leveling approach systematically. For minor slopes, this means cutting into the high side and building up the low side with compacted fill material. For moderate to significant slopes, you may need to create a tiered or stepped foundation using landscape timbers, gravel beds, or a combination of both. Always compact fill material in layers—never add more than 2–3 inches of loose material at a time before tamping. This prevents future settling that would re-create the uneven surface you just corrected. Plan for this step to take 1–3 hours depending on terrain severity.

    Step 3: Place, Check, and Anchor Your Raised Bed

    With your prepared surface ready, position your raised garden bed carefully. Use a bubble level across multiple points—both the long sides, the short sides, and corner-to-corner diagonals—to confirm true level in all directions. Make small adjustments by adding or removing material under specific points of the frame. Once level is confirmed, stake or anchor the bed according to the manufacturer’s recommendations, add your landscape fabric liner if desired, and begin filling with your soil mix in layers to avoid shifting the frame during fill.


    Comparing the Three Main Leveling Methods

    Different terrain conditions call for different solutions. Here’s a practical comparison of the three most common approaches gardeners use to level raised beds on uneven ground:

    Comparison Dimension Cut-and-Fill Method Gravel Base Method Stacked Frame/Riser Method
    Best For Mild to moderate slopes (1–4 inches variance) Moderate slopes with poor drainage Steep slopes or very uneven terrain
    Skill Level Required Beginner to intermediate Beginner Intermediate
    Primary Materials Soil, fill dirt, tamping tool Gravel, landscape fabric, level Additional frame sections or riser boards
    Drainage Performance Good if done correctly Excellent Excellent
    Time Investment 1–3 hours 2–4 hours 2–5 hours
    Cost Level Low Low to moderate Moderate
    Long-term Stability Good on compacted native soil Very good Very good to excellent
    Best Bed Height Range 18-inch standard beds All heights 24-inch and taller extra-tall beds

    Each of these methods can be used with any of Anleolife’s raised garden bed configurations, and in practice, many gardeners combine elements from multiple approaches for the best results.


    Detailed Method Breakdown: What to Actually Do on the Ground

    The Cut-and-Fill Method: Simple and Effective for Most Yards

    The cut-and-fill method is the most straightforward approach and works well for the majority of residential yards with gentle to moderate slopes. The core principle is simple: remove soil from the high side of your bed’s footprint and use it (or additional compactible fill material) to build up the low side until the entire footprint is level.

    Start by outlining the exact footprint of your bed using stakes and string. Use your line level to identify the highest corner—this becomes your reference point. All other points need to be raised to match this height. Dig down on the high side, removing topsoil carefully (you can reuse it in your bed later). On the low side, add fill material in 2–3 inch layers, tamping firmly with a hand tamper or plate compactor between each layer.

    One practical tip: use a long straight board (2×4 works well) laid across the footprint with a bubble level on top to check level repeatedly as you work. Checking at multiple angles—lengthwise, crosswise, and diagonally—ensures you catch any twist in the surface, not just one-directional slope.

    For Anleolife’s standard 18-inch raised beds in larger footprints like the 12×3 or 8×4 configurations, this method typically takes an afternoon and produces excellent results. The key is patience with the compaction process—rushing it leads to settling within the first growing season.

    The Gravel Base Method: Superior Drainage Meets Stability

    When your yard has both uneven terrain and known drainage challenges, the gravel base method solves two problems simultaneously. Rather than working exclusively with native soil, you excavate the entire bed footprint to a consistent depth (typically 4–6 inches below your lowest reference point), then fill this excavated area with compacted gravel to create a perfectly level, highly permeable base.

    Begin by excavating the footprint uniformly. Lay landscape fabric on the excavated floor to prevent weed intrusion and soil migration into the gravel layer. Add coarse gravel (3/4-inch crushed stone works well) in layers, checking level constantly with your board and bubble level. Once your gravel base is level and fully compacted, place your raised bed frame directly on top.

    This method is particularly well-suited to Anleolife’s taller beds—the 24-inch extra-tall and 30-inch extra-tall configurations—because the gravel base provides excellent drainage for the deeper root zones these beds support, while also creating a rock-solid, stable foundation. The gravel also naturally discourages burrowing pests from entering the bed from below.

    The Stacked Frame or Riser Method: Elegant Solutions for Challenging Terrain

    For more dramatic slope changes or genuinely challenging terrain, the stacked frame or riser method takes a different philosophical approach: instead of making the ground perfectly level, you adapt the bed’s foundation to accommodate the terrain while keeping the top of the bed level.

    In practice, this often means using landscape timbers, treated lumber, or concrete blocks on the downhill side to raise that edge of the frame until it matches the height of the uphill side. The frame itself sits level even if the ground underneath it isn’t. The cavity between the bottom of the raised frame section and the ground is typically filled with gravel for stability and drainage.

    This approach works beautifully on terraced hillside gardens and is frequently used by empty nesters and retirees who want to establish productive garden areas on sloped properties without undertaking major landscaping projects. It also pairs naturally with Anleolife’s modular raised garden bed systems, which are designed with flexibility in mind, allowing gardeners to configure and expand their growing space as their needs evolve.

    Raised metal garden bed installed level on a sloped backyard with gravel base and landscape fabric visible
    ALT: Galvanized steel raised garden bed installed level on uneven sloped ground using gravel base leveling method in a residential backyard garden


    Advanced Considerations: Handling Special Situations and Common Misconceptions

    When Your Slope Is Steeper Than Expected

    If you discover mid-project that your slope is more significant than initial assessment suggested, don’t push through with an inadequate solution. For slopes where the variance across the bed footprint exceeds 6 inches, consider splitting your planned footprint into two separate beds arranged as a stair-step terrace rather than one large level bed. This distributes the engineering challenge and often results in a more visually attractive, practical garden design. Anleolife’s modular raised garden bed configurations are well-suited to this kind of adaptive arrangement.

    Handling Soft or Waterlogged Soil

    Soft, waterlogged soil presents a special challenge because compacted fill material can settle significantly after wet weather. In these situations, it’s worth digging down to find more stable subsoil or using a gravel base of greater depth—sometimes 8 inches or more—before placing your bed frame. Adding a layer of coarse sand between native soil and gravel also improves load-bearing stability in high-moisture environments.

    The Most Common Leveling Misconception: “Close Enough” Is Enough

    Many first-time raised bed gardeners assume that a slight tilt—say, half an inch across an 8-foot bed—is negligible. In the first season, it often is. But over time, that small variance concentrates water runoff consistently to one end, causes uneven soil settling, and places chronic one-sided stress on the bed’s frame joints. Over the 20-year lifespan of a well-built bed like those in Anleolife’s lineup, the cumulative effect of even a modest tilt can be significant. Taking an extra 30 minutes to get truly level at installation pays dividends for years.

    After Leveling: What Comes Next

    Once your bed is level, secure it appropriately. Drive included stakes or anchoring hardware into the ground at the corners and along long sides to prevent frame movement during soil expansion from watering. Add landscape fabric or hardware cloth to the base if pest pressure is a concern in your area. Fill with your chosen soil mix in stages rather than all at once, pausing to check level after each major addition. Soil weight can shift a frame on freshly prepared ground if added too quickly.


    Frequently Asked Questions FAQ

    Q1: How do I know if my raised garden bed is level enough before filling it with soil?

    Use a 4-foot or longer carpenter’s level laid across the top rail of your bed in multiple directions—along both long sides, both short sides, and diagonally corner to corner. A reading within 1/8 inch across the full length of the bed is generally considered level for garden purposes. If you’re working with a longer bed (8 feet or more), use a line level and string stretched taut across the corners for more accurate measurement over a greater distance. Always check in at least three directions to detect any twist or warp in the frame placement.

    Q2: Is it necessary to remove grass and weeds before installing a raised garden bed on uneven ground?

    Yes, removing existing vegetation before leveling and installation is strongly recommended. Grass and weeds left under a raised bed will decompose unevenly, causing settling that disrupts your level surface over time. They can also push through into your bed. Either remove vegetation manually with a sod cutter, smother it with cardboard (the lasagna gardening method) well in advance of installation, or use a non-residual herbicide according to label instructions. Cardboard smothering is the preferred eco-friendly approach and aligns well with the values of most health-oriented home growers.

    Q3: How long does it take to properly level ground for a raised garden bed, and how much does it cost?

    For a standard 8×4 raised bed on a gentle slope, budget approximately 2–4 hours for site preparation and leveling using the cut-and-fill or gravel base method. Material costs are typically low—primarily gravel (if using), landscape fabric, and any additional fill dirt needed, usually totaling $20–$60 depending on your local market and the severity of the slope. More dramatic terrain corrections with retaining elements may take a full day and cost more. Investing this time and modest budget upfront protects a bed that’s built to last 20 years.


    Summary

    Leveling a raised garden bed on uneven ground isn’t glamorous work, but it is genuinely foundational work that determines how well your garden performs for years to come. Getting it right comes down to three core principles.

    First, assess before you act. Measure your slope carefully across the full footprint of your planned bed before committing to a leveling strategy. A small variance calls for a different solution than a significant grade change, and knowing the difference saves time and effort.

    Second, choose the right method for your terrain. The cut-and-fill method is efficient for mild slopes, the gravel base method excels where drainage is also a concern, and the stacked frame or riser approach handles more dramatic terrain beautifully. Don’t try to force one method onto terrain that calls for another.

    Third, prioritize true level, not close enough. Taking the time to achieve genuine level at installation—checking in multiple directions, compacting fill material properly, and anchoring the frame before filling—protects both the structural integrity of your bed and the health of your plants over the long growing seasons ahead.

    Your raised garden bed is an investment in fresh food, outdoor wellbeing, and the quality of your home environment. Give it the foundation it deserves.


    Start Growing with Confidence — Anleolife Has You Covered

    Nationwide U.S. warehouse network: Strategically located in California, Texas, Florida, New York, Illinois, and Washington to ensure delivery within 3–8 business days—so your garden upgrade plans never have to wait.

    Multi-channel sales network: Products are available on major e-commerce platforms including Amazon, Walmart, Home Depot, Lowe’s, and Wayfair, as well as the official website Anleolife.com, providing consistent quality assurance and after-sales service.

    Three core scenarios: Planting (metal raised garden beds, soil systems), Raising (chicken coops, rabbit hutches), and Beautification (decorative accessories, pathway systems)—meeting complete needs from functionality to aesthetics.

    Upgrade your garden with Anleolife. We understand that an ideal garden is not built overnight, but gradually improved over time. Our modular product design allows flexible expansion based on your needs—from your first raised garden bed to a fully integrated planting-and-raising ecosystem. We grow with you every step of the way.


    References

    1. University of California Cooperative Extension. “Building Raised Bed Gardens”.
      https://ucanr.edu/sites/MarinMG/files/303388.pdf
    2. Oregon State University Extension Service. “Raised Bed Gardening”.
      https://extension.oregonstate.edu/gardening/techniques/raised-bed-gardening
    3. University of Minnesota Extension. “Raised Bed Gardening for Vegetables”.
      https://extension.umn.edu/how/raised-bed-gardening
    4. National Gardening Association. “Raised Bed Gardening Guide”.
      https://garden.org/learn/articles/view/318/
    5. Penn State Extension. “Site Selection and Preparation for Home Gardens”.
      https://extension.psu.edu/site-selection-and-preparation-for-home-gardens

    Note: Standards and best practices may be updated over time. Please check the latest official documents or consult professional advisors for the most current guidance.


    About Anleolife

    Anleolife is a leading outdoor garden solutions provider in North America, dedicated to offering a full-scenario product ecosystem for home gardening enthusiasts, covering planting, raising, and garden beautification. Since its founding, we have upheld our brand mission, “Made for Garden Life,” continuously innovating products and optimizing services to help hundreds of thousands of users upgrade their gardens, reconnect with nature, and enjoy a better garden lifestyle.


  • How to Level a Raised Garden Bed on Uneven Ground

    A gardener leveling a raised garden bed on a sloped backyard with tools and soil visible
    ALT: Gardener leveling a metal raised garden bed on uneven ground in a residential backyard garden

    Why Leveling Your Raised Garden Bed on Uneven Ground Matters More Than You Think

    Key Conclusion: A properly leveled raised garden bed is the foundation of a productive, long-lasting garden. Whether you’re working with a gentle slope or genuinely uneven terrain, taking the time to level your raised bed garden layout correctly prevents water pooling, soil erosion, and structural instability. Getting this step right from the beginning protects your investment, improves plant health, and ensures your raised bed planting layout performs season after season for years to come.

    If you’ve ever set up a raised garden bed only to watch water drain off to one side, watch soil shift toward a corner, or notice your plants tilting at an odd angle, you already understand the real-world consequences of an unlevel bed. Leveling isn’t just an aesthetic concern—it directly affects drainage patterns, root development, and the structural integrity of the bed walls themselves. The good news is that leveling a raised garden bed on uneven ground is a manageable DIY task with the right approach, tools, and understanding of your specific terrain. Whether you’re a first-time gardener setting up your initial raised bed layout or an experienced grower expanding an established garden, this guide walks you through every practical step.


    Who This Guide Is For (and When Leveling Is Essential)

    ✅ Applicable Scenarios:

    • Homeowners installing raised garden beds on naturally sloped or rolling backyard terrain
    • Urban and suburban gardeners working with compacted, uneven soil or patchy lawns
    • Empty nesters or retirees converting yard space into productive kitchen gardens on imperfect ground
    • Gardeners upgrading from in-ground planting to a raised bed system on hillside or terraced yards
    • Anyone setting up taller or extra-tall raised beds where stability is critical

    ❌ Not Applicable/Cautions:

    • Beds installed on perfectly flat, pre-leveled concrete or patio surfaces (leveling work is already done)
    • Container gardening on balconies or elevated decks with adjustable platform systems
    • Slopes steeper than 30 degrees, where full terracing or retaining wall construction is a better structural solution than simple bed leveling
    • Situations where underground utility lines or tree roots are present—always check before digging

    Understanding Why Uneven Ground Is Such a Common Challenge for Raised Bed Gardeners

    Most residential yards in North America are anything but perfectly flat. Natural landscaping, grading for drainage, tree root systems, and decades of soil settling all contribute to terrain that looks manageable at a glance but reveals its complexity the moment you try to place a rectangular garden bed on it. According to the University of California Cooperative Extension, proper site preparation—including leveling—is one of the most important factors in raised bed performance and longevity.

    The challenge is compounded by the fact that raised garden beds come in many sizes and heights. A low-profile 18-inch bed on a mild slope may seem stable initially, but over a season of rain and watering, unlevel placement leads to predictable problems: uneven moisture distribution, concentrated soil compaction on the downhill side, accelerated wear on one wall of the bed frame, and in some cases, complete structural failure.

    For taller beds—those in the 24-inch to 35-inch extra-tall or waist-high range—the problem is even more pronounced. A taller column of soil exerts significantly more lateral pressure on the walls, and any tilt amplifies that force unevenly. This is why professional gardeners and landscape designers consistently emphasize leveling as a non-negotiable first step before filling a bed with soil.

    At Anleolife, we’ve designed our galvanized steel and rust-resistant raised garden beds to last up to 20 years, but even the most durable, well-engineered bed will underperform if it’s sitting on improperly prepared ground. The structural integrity of the frame, the drainage behavior of your soil mix, and the health of your plants all depend on that foundational level surface.

    The good news: leveling uneven ground for a raised garden bed doesn’t require heavy equipment or professional landscaping services in most cases. With the right knowledge, a few basic tools, and a methodical approach, it’s a project most gardeners can complete in a weekend afternoon.


    How to Level a Raised Garden Bed on Uneven Ground: Step-by-Step Solutions

    Three-Step Quick Start

    Step 1: Assess Your Terrain and Choose Your Leveling Strategy

    Before picking up a shovel, spend 15–20 minutes thoroughly evaluating your site. Use a long carpenter’s level or a line level and string to measure how much your ground varies across the footprint of your planned bed. Note whether the slope runs lengthwise, crosswise, or diagonally. Record the highest and lowest points—this measurement tells you whether you’re dealing with a minor correction (under 2 inches) or a more significant grade change that requires additional material or excavation. Your terrain assessment directly determines which of the three primary leveling methods you’ll use.

    Step 2: Prepare the Ground Using Your Chosen Method

    Once you know your slope, execute your leveling approach systematically. For minor slopes, this means cutting into the high side and building up the low side with compacted fill material. For moderate to significant slopes, you may need to create a tiered or stepped foundation using landscape timbers, gravel beds, or a combination of both. Always compact fill material in layers—never add more than 2–3 inches of loose material at a time before tamping. This prevents future settling that would re-create the uneven surface you just corrected. Plan for this step to take 1–3 hours depending on terrain severity.

    Step 3: Place, Check, and Anchor Your Raised Bed

    With your prepared surface ready, position your raised garden bed carefully. Use a bubble level across multiple points—both the long sides, the short sides, and corner-to-corner diagonals—to confirm true level in all directions. Make small adjustments by adding or removing material under specific points of the frame. Once level is confirmed, stake or anchor the bed according to the manufacturer’s recommendations, add your landscape fabric liner if desired, and begin filling with your soil mix in layers to avoid shifting the frame during fill.


    Comparing the Three Main Leveling Methods

    Different terrain conditions call for different solutions. Here’s a practical comparison of the three most common approaches gardeners use to level raised beds on uneven ground:

    Comparison Dimension Cut-and-Fill Method Gravel Base Method Stacked Frame/Riser Method
    Best For Mild to moderate slopes (1–4 inches variance) Moderate slopes with poor drainage Steep slopes or very uneven terrain
    Skill Level Required Beginner to intermediate Beginner Intermediate
    Primary Materials Soil, fill dirt, tamping tool Gravel, landscape fabric, level Additional frame sections or riser boards
    Drainage Performance Good if done correctly Excellent Excellent
    Time Investment 1–3 hours 2–4 hours 2–5 hours
    Cost Level Low Low to moderate Moderate
    Long-term Stability Good on compacted native soil Very good Very good to excellent
    Best Bed Height Range 18-inch standard beds All heights 24-inch and taller extra-tall beds

    Each of these methods can be used with any of Anleolife’s raised garden bed configurations, and in practice, many gardeners combine elements from multiple approaches for the best results.


    Detailed Method Breakdown: What to Actually Do on the Ground

    The Cut-and-Fill Method: Simple and Effective for Most Yards

    The cut-and-fill method is the most straightforward approach and works well for the majority of residential yards with gentle to moderate slopes. The core principle is simple: remove soil from the high side of your bed’s footprint and use it (or additional compactible fill material) to build up the low side until the entire footprint is level.

    Start by outlining the exact footprint of your bed using stakes and string. Use your line level to identify the highest corner—this becomes your reference point. All other points need to be raised to match this height. Dig down on the high side, removing topsoil carefully (you can reuse it in your bed later). On the low side, add fill material in 2–3 inch layers, tamping firmly with a hand tamper or plate compactor between each layer.

    One practical tip: use a long straight board (2×4 works well) laid across the footprint with a bubble level on top to check level repeatedly as you work. Checking at multiple angles—lengthwise, crosswise, and diagonally—ensures you catch any twist in the surface, not just one-directional slope.

    For Anleolife’s standard 18-inch raised beds in larger footprints like the 12×3 or 8×4 configurations, this method typically takes an afternoon and produces excellent results. The key is patience with the compaction process—rushing it leads to settling within the first growing season.

    The Gravel Base Method: Superior Drainage Meets Stability

    When your yard has both uneven terrain and known drainage challenges, the gravel base method solves two problems simultaneously. Rather than working exclusively with native soil, you excavate the entire bed footprint to a consistent depth (typically 4–6 inches below your lowest reference point), then fill this excavated area with compacted gravel to create a perfectly level, highly permeable base.

    Begin by excavating the footprint uniformly. Lay landscape fabric on the excavated floor to prevent weed intrusion and soil migration into the gravel layer. Add coarse gravel (3/4-inch crushed stone works well) in layers, checking level constantly with your board and bubble level. Once your gravel base is level and fully compacted, place your raised bed frame directly on top.

    This method is particularly well-suited to Anleolife’s taller beds—the 24-inch extra-tall and 30-inch extra-tall configurations—because the gravel base provides excellent drainage for the deeper root zones these beds support, while also creating a rock-solid, stable foundation. The gravel also naturally discourages burrowing pests from entering the bed from below.

    The Stacked Frame or Riser Method: Elegant Solutions for Challenging Terrain

    For more dramatic slope changes or genuinely challenging terrain, the stacked frame or riser method takes a different philosophical approach: instead of making the ground perfectly level, you adapt the bed’s foundation to accommodate the terrain while keeping the top of the bed level.

    In practice, this often means using landscape timbers, treated lumber, or concrete blocks on the downhill side to raise that edge of the frame until it matches the height of the uphill side. The frame itself sits level even if the ground underneath it isn’t. The cavity between the bottom of the raised frame section and the ground is typically filled with gravel for stability and drainage.

    This approach works beautifully on terraced hillside gardens and is frequently used by empty nesters and retirees who want to establish productive garden areas on sloped properties without undertaking major landscaping projects. It also pairs naturally with Anleolife’s modular raised garden bed systems, which are designed with flexibility in mind, allowing gardeners to configure and expand their growing space as their needs evolve.

    Raised metal garden bed installed level on a sloped backyard with gravel base and landscape fabric visible
    ALT: Galvanized steel raised garden bed installed level on uneven sloped ground using gravel base leveling method in a residential backyard garden


    Advanced Considerations: Handling Special Situations and Common Misconceptions

    When Your Slope Is Steeper Than Expected

    If you discover mid-project that your slope is more significant than initial assessment suggested, don’t push through with an inadequate solution. For slopes where the variance across the bed footprint exceeds 6 inches, consider splitting your planned footprint into two separate beds arranged as a stair-step terrace rather than one large level bed. This distributes the engineering challenge and often results in a more visually attractive, practical garden design. Anleolife’s modular raised garden bed configurations are well-suited to this kind of adaptive arrangement.

    Handling Soft or Waterlogged Soil

    Soft, waterlogged soil presents a special challenge because compacted fill material can settle significantly after wet weather. In these situations, it’s worth digging down to find more stable subsoil or using a gravel base of greater depth—sometimes 8 inches or more—before placing your bed frame. Adding a layer of coarse sand between native soil and gravel also improves load-bearing stability in high-moisture environments.

    The Most Common Leveling Misconception: “Close Enough” Is Enough

    Many first-time raised bed gardeners assume that a slight tilt—say, half an inch across an 8-foot bed—is negligible. In the first season, it often is. But over time, that small variance concentrates water runoff consistently to one end, causes uneven soil settling, and places chronic one-sided stress on the bed’s frame joints. Over the 20-year lifespan of a well-built bed like those in Anleolife’s lineup, the cumulative effect of even a modest tilt can be significant. Taking an extra 30 minutes to get truly level at installation pays dividends for years.

    After Leveling: What Comes Next

    Once your bed is level, secure it appropriately. Drive included stakes or anchoring hardware into the ground at the corners and along long sides to prevent frame movement during soil expansion from watering. Add landscape fabric or hardware cloth to the base if pest pressure is a concern in your area. Fill with your chosen soil mix in stages rather than all at once, pausing to check level after each major addition. Soil weight can shift a frame on freshly prepared ground if added too quickly.


    Frequently Asked Questions FAQ

    Q1: How do I know if my raised garden bed is level enough before filling it with soil?

    Use a 4-foot or longer carpenter’s level laid across the top rail of your bed in multiple directions—along both long sides, both short sides, and diagonally corner to corner. A reading within 1/8 inch across the full length of the bed is generally considered level for garden purposes. If you’re working with a longer bed (8 feet or more), use a line level and string stretched taut across the corners for more accurate measurement over a greater distance. Always check in at least three directions to detect any twist or warp in the frame placement.

    Q2: Is it necessary to remove grass and weeds before installing a raised garden bed on uneven ground?

    Yes, removing existing vegetation before leveling and installation is strongly recommended. Grass and weeds left under a raised bed will decompose unevenly, causing settling that disrupts your level surface over time. They can also push through into your bed. Either remove vegetation manually with a sod cutter, smother it with cardboard (the lasagna gardening method) well in advance of installation, or use a non-residual herbicide according to label instructions. Cardboard smothering is the preferred eco-friendly approach and aligns well with the values of most health-oriented home growers.

    Q3: How long does it take to properly level ground for a raised garden bed, and how much does it cost?

    For a standard 8×4 raised bed on a gentle slope, budget approximately 2–4 hours for site preparation and leveling using the cut-and-fill or gravel base method. Material costs are typically low—primarily gravel (if using), landscape fabric, and any additional fill dirt needed, usually totaling $20–$60 depending on your local market and the severity of the slope. More dramatic terrain corrections with retaining elements may take a full day and cost more. Investing this time and modest budget upfront protects a bed that’s built to last 20 years.


    Summary

    Leveling a raised garden bed on uneven ground isn’t glamorous work, but it is genuinely foundational work that determines how well your garden performs for years to come. Getting it right comes down to three core principles.

    First, assess before you act. Measure your slope carefully across the full footprint of your planned bed before committing to a leveling strategy. A small variance calls for a different solution than a significant grade change, and knowing the difference saves time and effort.

    Second, choose the right method for your terrain. The cut-and-fill method is efficient for mild slopes, the gravel base method excels where drainage is also a concern, and the stacked frame or riser approach handles more dramatic terrain beautifully. Don’t try to force one method onto terrain that calls for another.

    Third, prioritize true level, not close enough. Taking the time to achieve genuine level at installation—checking in multiple directions, compacting fill material properly, and anchoring the frame before filling—protects both the structural integrity of your bed and the health of your plants over the long growing seasons ahead.

    Your raised garden bed is an investment in fresh food, outdoor wellbeing, and the quality of your home environment. Give it the foundation it deserves.


    Start Growing with Confidence — Anleolife Has You Covered

    Nationwide U.S. warehouse network: Strategically located in California, Texas, Florida, New York, Illinois, and Washington to ensure delivery within 3–8 business days—so your garden upgrade plans never have to wait.

    Multi-channel sales network: Products are available on major e-commerce platforms including Amazon, Walmart, Home Depot, Lowe’s, and Wayfair, as well as the official website Anleolife.com, providing consistent quality assurance and after-sales service.

    Three core scenarios: Planting (metal raised garden beds, soil systems), Raising (chicken coops, rabbit hutches), and Beautification (decorative accessories, pathway systems)—meeting complete needs from functionality to aesthetics.

    Upgrade your garden with Anleolife. We understand that an ideal garden is not built overnight, but gradually improved over time. Our modular product design allows flexible expansion based on your needs—from your first raised garden bed to a fully integrated planting-and-raising ecosystem. We grow with you every step of the way.


    References

    1. University of California Cooperative Extension. “Building Raised Bed Gardens”.
      https://ucanr.edu/sites/MarinMG/files/303388.pdf
    2. Oregon State University Extension Service. “Raised Bed Gardening”.
      https://extension.oregonstate.edu/gardening/techniques/raised-bed-gardening
    3. University of Minnesota Extension. “Raised Bed Gardening for Vegetables”.
      https://extension.umn.edu/how/raised-bed-gardening
    4. National Gardening Association. “Raised Bed Gardening Guide”.
      https://garden.org/learn/articles/view/318/
    5. Penn State Extension. “Site Selection and Preparation for Home Gardens”.
      https://extension.psu.edu/site-selection-and-preparation-for-home-gardens

    Note: Standards and best practices may be updated over time. Please check the latest official documents or consult professional advisors for the most current guidance.


    About Anleolife

    Anleolife is a leading outdoor garden solutions provider in North America, dedicated to offering a full-scenario product ecosystem for home gardening enthusiasts, covering planting, raising, and garden beautification. Since its founding, we have upheld our brand mission, “Made for Garden Life,” continuously innovating products and optimizing services to help hundreds of thousands of users upgrade their gardens, reconnect with nature, and enjoy a better garden lifestyle.


  • How to Add DIY Extension Parts to Your Existing Anleolife Raised Garden Bed

    DIY extension parts added to Anleolife raised garden bed in a backyard garden setting
    ALT: Homeowner adding DIY extension panels to an Anleolife galvanized steel raised garden bed for expanded planting space

    Why Expanding Your Raised Garden Bed Is Smarter Than Starting Over

    Key Conclusion: Expanding an existing raised garden bed is one of the most cost-effective, sustainable upgrades a home gardener can make. Rather than purchasing an entirely new unit, adding DIY extension parts to your Anleolife bed lets you optimize your raised bed garden layout, increase planting depth or square footage, and adapt your raised bed planting layout to seasonal crops—all without dismantling what already works. A well-planned raised bed layout extension can double your growing capacity while preserving your existing soil ecosystem.

    If you’ve been gardening in your Anleolife raised bed for a season or two, chances are you’ve already noticed the limitations of your original footprint. Maybe your tomatoes are crowding out the basil, or you’re running out of room for a late-season kale patch. The good news is you don’t need to start from scratch.

    Anleolife’s modular design philosophy was built with exactly this in mind—allowing gardeners to grow their setup incrementally. Whether you want to extend the height, widen the planting area, or connect multiple beds into a unified layout, DIY extensions are a practical, rewarding project that can be completed over a weekend with basic tools.


    Who Should (and Shouldn’t) Try This Project

    ✅ Applicable Scenarios:

    • You already own an Anleolife galvanized steel or rust-resistant raised garden bed and want to maximize its planting capacity
    • You’re transitioning from shallow herb growing to deeper root vegetables like carrots, parsnips, or potatoes and need extra bed height
    • You want to connect two or more beds into a continuous raised bed garden layout for a cohesive, organized backyard aesthetic
    • You’re a retiree or empty nester with more time to invest in your garden and want a meaningful weekend project
    • You’re an eco-conscious grower looking to expand food production without purchasing an entirely new product

    ❌ Not Applicable/Cautions:

    • If your existing bed shows severe structural damage, rust compromise, or warped panels, it’s better to replace the unit rather than extend it—extensions are designed to complement structurally sound beds
    • If you’re renting a property and cannot make permanent ground modifications, freestanding extension kits are your only safe option; staked extensions may not be suitable
    • Homeowners with HOA restrictions should verify local guidelines before altering bed dimensions or adding visible structural elements

    The Growing Demand for Expandable Garden Bed Systems

    Home gardening has experienced a dramatic surge in the United States over the past several years. According to the National Gardening Association, the number of American households engaged in food gardening grew significantly during and after the pandemic years, with raised bed gardening consistently ranking among the most popular formats. This popularity isn’t just a trend—it reflects a deeper shift toward self-sufficiency, health-conscious living, and sustainable food sourcing.

    But as new gardeners gain confidence, a common friction point emerges: the original bed they purchased no longer fits their ambitions. A 4×4 starter bed that once felt spacious quickly becomes limiting when you’re trying to grow a diverse summer harvest. Many gardeners find themselves facing a choice: buy an entirely new bed, or find a smarter way to expand what they already have.

    The modular raised garden bed category has emerged as a direct response to this challenge. Unlike fixed-dimension beds of the past, modern systems like Anleolife’s Modular Raised Garden Bed line are engineered with expansion in mind. Panels interlock, heights can be stacked, and configurations can be altered without specialized tools or professional installation.

    This is particularly meaningful for middle-class families who’ve invested in quality garden infrastructure and don’t want that investment to become obsolete as their gardening practice evolves. It’s also a win for environmentally conscious growers—extending an existing bed rather than discarding it aligns with a low-waste, high-value philosophy that defines thoughtful home gardening.

    Anleolife’s galvanized steel beds are built to last up to 20 years, which means your base structure is far from done. The real question is: how do you make it work harder for you?


    How to Add DIY Extension Parts to Your Anleolife Raised Garden Bed: Step-by-Step

    Three-Step Quick Start

    Step 1: Assess Your Current Bed and Define Your Goal

    Before purchasing any extension materials, spend 20–30 minutes evaluating your existing setup. Measure your current bed’s exterior dimensions, note the panel height and connection style (bolted corners vs. interlocking tabs), and decide whether your goal is to add height, length, or create a multi-bed configuration. Knowing your target outcome determines which extension approach—vertical stacking, horizontal panel addition, or connector bridging—is right for your situation.

    Step 2: Source Compatible Extension Panels or DIY Materials

    Once you know your extension goal, source materials that match your bed’s panel gauge and connection hardware. Anleolife’s modular beds use consistent sizing across their product range, making it easier to find compatible add-on panels. For true DIY additions, 16-gauge galvanized corrugated steel panels cut to matching heights are the most durable choice. Allow 1–2 hours for material sourcing and 30 minutes for pre-assembly layout planning before you begin installation.

    Step 3: Install, Secure, and Prep for Planting

    With materials ready, installation typically takes 1–3 hours depending on the complexity of your extension. Bolt or clip new panels to existing corner brackets, check for level alignment, and reinforce connection points with waterproof sealant if needed. Once assembled, add a weed barrier at any new soil-contact points and top up with fresh growing medium. Your expanded bed is ready for planting—no curing period needed for galvanized steel extensions.


    Comparing the Three Main Extension Approaches

    Choosing the right extension strategy depends on your bed model, available space, and gardening goals. Here’s a clear comparison of your three main options:

    Introductory note: Each approach has distinct advantages. Vertical height extensions are ideal for deep-root crops; horizontal panel additions maximize square footage; and multi-bed connector systems create a unified raised bed layout with shared pathways and aesthetic cohesion. Review the table below to identify which solution best fits your setup.

    Comparison Dimension Vertical Height Extension Horizontal Panel Addition Multi-Bed Connector System
    Applicable Products All Anleolife galvanized & rust-resistant beds Modular Raised Garden Bed series Any two compatible Anleolife beds
    Best Use Case Deep root vegetables, more soil volume Larger planting footprint, more crop variety Unified garden layout, pathway integration
    DIY Difficulty ⭐⭐ (Easy–Moderate) ⭐⭐⭐ (Moderate) ⭐⭐ (Easy with connector hardware)
    Material Cost Estimate $15–$45 for stacking panels $30–$80 for additional panel sections $10–$25 for connector brackets
    Structural Modification Minimal—stacks on existing corners Moderate—requires new corner posts Minimal—surface-level brackets
    Soil Addition Required Yes—fill new height with fresh mix Yes—fill expanded area Optional—depends on bed condition
    Recommended for Beginners ✅ ❌ (better with some experience) ✅
    Compatible with 20-Year Lifespan Beds ✅ ✅ ✅

    Detailed Walkthrough: Each Extension Method Explained

    Method 1: Vertical Height Extension (Stacking Panels)

    The most popular DIY extension for Anleolife beds is adding height by stacking an additional panel tier on top of the existing structure. This approach is especially valuable for gardeners transitioning to deeper-rooted crops like carrots (which need 12+ inches), beets, or sweet potatoes.

    What you’ll need: Matching corrugated steel panels (cut to your bed’s length), corner connector brackets, stainless steel bolts, a drill with a metal bit, and a rubber mallet.

    Start by clearing the top edge of your existing bed of any soil, debris, or plant matter. Measure the perimeter and cut your new panels to exact length if they’re not pre-cut. Anleolife’s Modular Raised Garden Bed panels in the 18″–24″ Tall range are designed with stackable edge profiles, making the alignment process straightforward. Slide the new panel against the exterior of the existing top edge, align the pre-drilled holes, and secure with stainless bolts. Work around the perimeter before tightening any single joint completely—this ensures even alignment.

    Once the new tier is secured, use waterproof exterior caulk or foam backer rod along any interior seams that may allow soil leakage. Add your additional growing medium—a mix of topsoil, compost, and perlite works well—and you’re ready to plant.

    For gardeners with the 24″ Extra Tall 8×4 ft or 30″ Extra Tall 6×3 ft models who want even greater depth, this method can bring total soil depth to 35″–42″ when stacked—ideal for a true no-dig permaculture approach.

    Method 2: Horizontal Panel Addition (Width or Length Expansion)

    Expanding the footprint of your bed is more involved but tremendously rewarding if you’re trying to scale your raised bed planting layout. This approach works best with Anleolife’s Modular Raised Garden Bed series, which includes the 18″ Tall 12×3 ft, 18″ Tall 8×4 ft, and 24″ Extra Tall 8×4 ft models—all designed with panel-based assembly that can be reconfigured.

    What you’ll need: Additional side panels (matching your existing bed’s height), new corner posts, a level, a post pounder or mallet, and galvanized corner brackets.

    Begin by temporarily disassembling one end of your existing bed. Position new panels at a perpendicular or parallel extension point, anchor new corner posts into the ground, and reconnect the existing panel to the new post. The key challenge here is maintaining a level plane across the original and extended sections—use a long spirit level or laser level to check alignment before backfilling.

    This method effectively creates an L-shaped, U-shaped, or extended rectangular raised bed garden layout—excellent for organizing crop families by section. For example, you might dedicate the original 8×4 ft section to heat-loving crops (tomatoes, peppers, eggplant) and the new extension to cool-season greens (lettuce, spinach, kale).

    Method 3: Multi-Bed Connector System

    If you own multiple Anleolife beds or plan to add a second unit, a connector system bridges the two into a cohesive installation with a shared pathway or trellis anchor point between them. This is the simplest extension approach and doesn’t require modifying either bed.

    What you’ll need: Galvanized bridge connector brackets (available as hardware or DIY-fabricated), a tape measure, and basic hand tools.

    Position your two beds at your desired spacing—typically 18″–24″ apart to allow comfortable kneeling access. Attach bridge brackets at the top rail of each bed, spanned across the gap. These brackets can also serve as anchor points for shade cloth frames, trellis netting, or protective row cover hoops—turning your expansion into a fully functional growing station.

    This configuration works beautifully with Anleolife’s Heavy Duty Raised Garden Beds in the 30″ Extra Tall 10×3 ft configuration—two units side by side create a visually striking, highly productive garden wall.

    Material Selection: What Works and What to Avoid

    When sourcing DIY extension materials, prioritize galvanized steel at 16-gauge or heavier. Avoid untreated wood panels adjacent to existing metal beds—the differential expansion rates can stress connection hardware over time. Avoid aluminum panels as well; while lightweight, they flex under soil pressure in a way that galvanized steel doesn’t.

    For fasteners, always use stainless steel or hot-dip galvanized bolts and nuts. Standard zinc-plated hardware will begin to corrode within 2–3 seasons, compromising your extension’s structural integrity. Given that Anleolife’s base beds are built for a 20-year lifespan, your extension hardware should be rated accordingly.

    Close-up of DIY stacking panels being added to Anleolife galvanized raised garden bed with bolt connections
    ALT: DIY vertical extension panels being bolted onto an Anleolife galvanized steel raised garden bed to increase planting depth for root vegetables


    Advanced Considerations for Long-Term Expansion Planning

    Planning Your Layout Before You Build

    One of the most common mistakes gardeners make is expanding reactively—adding a panel here, a bed there—without a unified vision. Before committing to any extension, sketch your ideal raised bed garden layout on paper or use a free garden planning tool. Consider sun exposure across all bed positions at different times of day, water access points, and pathway widths (at minimum 18″ for comfortable access, 24″+ for wheelbarrow passage).

    Soil Management Across Expanded Beds

    When you add volume to an existing bed—whether by height or footprint—you’re introducing new, unestablished soil alongside your mature, microbially active growing medium. To bridge this gap, incorporate 20–30% of your existing bed’s soil into the new extension section. This “inoculates” the fresh soil with beneficial microorganisms and earthworms, accelerating the establishment of a healthy soil food web.

    Seasonal Expansion Strategy

    Not all crops need the same depth or space year-round. Consider a modular expansion approach: add your vertical height extension in late winter before the spring planting rush, and save horizontal footprint expansion for the fall when the bed is cleared. This staggers your workload and lets you observe how each change affects your microclimate before committing to the next phase.

    Misconception: “Modular Means Weaker”

    A common concern among first-time DIY extenders is that adding panels will weaken the structural integrity of the bed. In practice, the opposite is often true—additional corner posts and cross-bracing introduced during horizontal extension actually stiffen the entire structure. Anleolife’s Heavy Duty Raised Garden Beds are engineered with reinforced panel connections specifically to support multi-tier and extended configurations without compromising rigidity.


    Frequently Asked Questions FAQ

    Q1: How do I know which Anleolife bed model is most compatible with DIY extensions?

    The Modular Raised Garden Bed series—including the 18″ Tall 6×2 ft, 8×4 ft, 12×3 ft, 24″ Extra Tall 8×4 ft, and 30″ Extra Tall 8×4 ft models—is specifically engineered for flexible reconfiguration and is the most extension-friendly line. However, all Anleolife galvanized steel and rust-resistant beds share consistent panel gauge and hardware sizing, meaning extension panels sourced from the same product line will align correctly. When in doubt, reference your model’s original assembly diagram or contact Anleolife’s customer support team before purchasing extension materials.

    Q2: Are DIY extensions covered under Anleolife’s product warranty or quality guarantee?

    DIY-added extension panels and third-party hardware are not covered under Anleolife’s product guarantee, as they fall outside the original product scope. However, the original bed structure—rated for up to 20 years of use—remains fully supported. To protect your base investment, use only compatible materials and ensure any modifications don’t compromise the original panel connections or corner post integrity. If you’re uncertain about a specific modification, Anleolife’s support team can advise on best practices before you begin.

    Q3: How long does a typical DIY bed extension project take, and what does it cost?

    For a vertical height extension (the most common DIY project), expect 2–4 hours from start to finish, including material prep, assembly, and soil top-up. Material costs range from $15 to $80 depending on panel length and hardware quality. A multi-bed connector setup can be completed in under 2 hours for under $30. Horizontal footprint expansion is the most time-intensive option at 4–6 hours, with material costs ranging from $40 to $120. Most gardeners find the investment pays back within a single growing season through increased harvest yield.


    Summary

    Expanding your Anleolife raised garden bed with DIY extension parts is one of the highest-value upgrades you can make as a home gardener. Rather than replacing a perfectly functional, long-lasting bed, you’re building on a proven foundation—literally and figuratively.

    Here are the three core takeaways to carry forward:

    1. Choose the right extension method for your goal: Vertical stacking for deeper root crops, horizontal addition for more planting area, and multi-bed connectors for a unified garden layout. Each approach has a clear use case, and matching the method to your actual needs saves time and money.
    2. Use materials built to last: Your Anleolife bed is designed for a 20-year lifespan. Your extension materials should be held to the same standard—16-gauge galvanized steel panels and stainless steel fasteners are non-negotiable for long-term performance.
    3. Plan your layout before you build: A thoughtful raised bed garden layout that accounts for sun, water access, and pathway widths will serve you better than a reactive expansion. Sketch it out, measure twice, and build with confidence.

    The best garden is one that grows with you. Whether you’re adding 6 inches of depth for your first carrot harvest or bridging two beds into a full-scale growing station, every extension is a step toward the garden you’ve always envisioned.

    Start Your Expansion with Anleolife

    Anleolife supports your garden at every stage of growth—from your first bed to a complete outdoor growing ecosystem.

    Nationwide U.S. Warehouse Network: Strategically located in California, Texas, Florida, New York, Illinois, and Washington, Anleolife ensures delivery within 3–8 business days—so your extension panels arrive promptly and your planting schedule stays on track.

    Multi-Channel Availability: Shop Anleolife products on Amazon, Walmart, Home Depot, Lowe’s, Wayfair, or directly at Anleolife.com for consistent quality assurance and dedicated after-sales support.

    Three Core Garden Scenarios: Whether you’re focused on Planting (metal raised garden beds, soil systems), Raising (chicken coops, rabbit hutches), or Beautification (decorative accessories, pathway systems), Anleolife offers a complete ecosystem from functionality to aesthetics.

    We understand that an ideal garden isn’t built overnight—it’s cultivated season by season. Our modular product design allows flexible expansion based on your needs, from your first 8×4 raised bed to a fully integrated planting-and-raising ecosystem. We grow with you every step of the way.

    👉 Explore Anleolife’s full raised garden bed collection at Anleolife.com


    References

    1. National Gardening Association. “Garden to Table: A 5-Year Look at Food Gardening in America”.
      https://garden.org
    2. University of California Agriculture and Natural Resources. “Raised Bed Gardening”.
      https://ucanr.edu/sites/scmg/Vegetable_Gardening/Raised_Bed_Gardening/
    3. USDA National Institute of Food and Agriculture. “Home Gardening and Food Systems”.
      https://www.nifa.usda.gov
    4. Penn State Extension. “Building and Managing Raised Bed Gardens”.
      https://extension.psu.edu/raised-bed-gardening
    5. Oregon State University Extension Service. “Raised Bed Gardening: Soil Preparation and Bed Construction”.
      https://extension.oregonstate.edu/gardening/techniques/raised-bed-gardening

    Note: Product specifications and compatibility details may be updated. Always verify current product dimensions on Anleolife.com or consult Anleolife’s customer support before beginning any DIY extension project.


    About Anleolife

    Anleolife is a leading outdoor garden solutions provider in North America, dedicated to offering a full-scenario product ecosystem for home gardening enthusiasts, covering planting, raising, and garden beautification. Since its founding, we have upheld our brand mission, “Made for Garden Life,” continuously innovating products and optimizing services to help hundreds of thousands of users upgrade their gardens, reconnect with nature, and enjoy a better garden lifestyle.


  • Winter Raised Garden Bed Care: How to Protect Your Galvanized Steel Bed and Soil

    Winter Raised Garden Bed Care
    ALT: Galvanized steel raised garden bed covered in snow with winter protection mulch and frost cloth

    Why Winter Raised Garden Bed Care Is the Secret to a Thriving Spring Garden

    Key Conclusion: Proper winter care for your raised garden bed isn’t just about survival — it’s about setting the stage for a spectacular spring. By protecting your galvanized steel structure from freeze-thaw stress and nurturing your soil biology through the cold months, you’re investing in a garden ecosystem that produces bigger yields, healthier plants, and less work come planting season. Whether you’re a seasoned home grower or just starting out, winterizing your raised bed is one of the smartest garden moves you can make.

    As temperatures drop and daylight shrinks, many home gardeners make the mistake of simply abandoning their raised beds until spring. But those quiet winter months are actually a golden window for soil restoration, structure maintenance, and smart preparation. Your galvanized steel raised garden bed is built to endure the elements — but even the toughest materials benefit from a little seasonal TLC.

    This guide walks you through everything you need to know: from protecting your metal structure against frost and moisture to rebuilding your soil ecosystem so it’s ready to roar back to life in March or April. Whether you’re managing one compact 4×4 bed or an expansive 12×3 ft multi-bed setup, these practical, proven strategies will help you protect your investment and hit the ground running next season.


    Who Should Follow This Winter Garden Bed Care Guide

    ✅ Applicable Scenarios:

    • Homeowners with galvanized steel raised garden beds in USDA Hardiness Zones 3–7 where hard freezes are common
    • Gardeners who have invested in long-term raised bed setups and want to protect that investment across multiple growing seasons
    • Organic and eco-conscious growers who want to use the winter season to build soil health naturally through composting and cover cropping
    • Empty nesters or retirees maintaining established raised bed gardens who prefer low-effort, high-impact seasonal maintenance routines
    • Urban micro-gardeners with limited outdoor space who rely on their raised beds for year-round productivity and can’t afford to start over each spring

    ❌ Not Applicable/Cautions:

    • Gardeners in frost-free zones (USDA Zones 9–13) where winter gardening continues year-round — your beds stay active and need different management strategies
    • Those with wooden raised beds, which have entirely different winterization needs regarding rot prevention, wood treatment, and structural integrity checks
    • Container gardeners or those using fabric grow bags, which may need to be brought indoors or collapsed during extreme cold

    Understanding What Winter Really Does to Your Raised Bed and Soil

    Winter is not passive for your garden — it’s actively reshaping both your bed structure and the biological community living inside your soil. Understanding the science behind these changes helps you make smarter decisions about what protection your bed actually needs.

    Freeze-thaw cycles are one of the most physically destructive forces in a temperate garden. When water seeps into small gaps or pores and then freezes, it expands by approximately 9%, exerting enormous pressure on surrounding materials. For soil, this means aggregates break apart, losing the structure that allows for good drainage and root penetration. For metal garden beds, repeated freeze-thaw exposure can stress joints, bolts, and seams — particularly in lower-quality products with thin coatings.

    This is precisely why galvanized steel is such a smart material choice for raised beds in cold climates. Anleolife’s galvanized steel raised garden beds are built with hot-dip galvanization — a thick, molecularly bonded zinc coating that acts as a sacrificial barrier against oxidation. Even as surface zinc gradually weathers, it continues to protect the underlying steel through cathodic protection. This engineering advantage, combined with thoughtful bed design, is why Anleolife beds are rated for a 20-year lifespan — far outlasting wood, plastic, or composite alternatives.

    What Happens to Soil in Winter

    Beneath the surface, your soil is far from dormant. Beneficial soil bacteria slow their metabolism dramatically below 50°F (10°C), but fungal networks — including the mycorrhizal fungi that form partnerships with plant roots — remain surprisingly active in cold, moist soil. This means the decisions you make about winter soil management directly affect the microbial community your spring plants will depend on.

    Left bare and exposed, your raised bed soil faces several threats:

    • Nutrient leaching: Winter rains and snowmelt flush water-soluble nutrients like nitrogen straight through unprotected soil and out the bed’s drainage holes
    • Erosion and compaction: Heavy precipitation can compact the surface and erode the fine structure you’ve spent seasons building
    • Biological disruption: Bare soil exposed to harsh UV and temperature swings loses organic matter faster and supports fewer beneficial organisms
    • Weed seed establishment: Ironically, bare soil in late winter becomes a prime seedbed for early-germinating weeds like chickweed and hairy bittercress

    The good news? All of these threats are manageable with the right winter care strategies. The American Horticultural Society and university extension programs across the country consistently confirm that proactive winter bed management leads to measurably better spring performance.

    The 20-Year Promise: Protecting Your Long-Term Investment

    When you invest in a quality raised bed system designed to last two decades, winter care becomes part of your return on investment strategy. An Anleolife galvanized steel raised garden bed can reliably serve your family for 20 years — but only if the soil inside it remains healthy and the structure itself is properly maintained between growing seasons. Think of winterizing as your annual maintenance appointment for a high-value piece of garden infrastructure.


    Complete Winter Care System: Step-by-Step Protection for Bed and Soil

    Three-Step Quick Start for Busy Gardeners

    If you’re pressed for time and need the essentials right now, here are the three most impactful things you can do before the first hard freeze:

    Step 1: Clear, Clean, and Inspect the Bed
    Remove all spent plant material, including roots if possible, to eliminate overwintering sites for pests and fungal diseases. Wipe down the interior walls of your galvanized steel bed with a damp cloth to remove soil buildup and check for any loose bolts, bent panels, or damaged corner pieces. This takes about 30–45 minutes and sets the foundation for everything else. Early action here pays dividends by preventing small structural issues from becoming bigger problems after a harsh winter.

    Step 2: Feed and Cover the Soil
    Add a 2–4 inch layer of compost or aged manure to the surface of your bed and work it lightly into the top inch of existing soil. Then apply a 3–4 inch mulch layer of straw, shredded leaves, or wood chips on top. This two-layer approach feeds soil biology while insulating it from temperature extremes. The entire process takes about 20–30 minutes per bed and is the single most impactful thing you can do for spring fertility. You can also direct-seed a cold-hardy cover crop like winter rye or crimson clover before mulching if your climate allows.

    Step 3: Add Physical Protection if Needed
    In USDA Zones 3–5 where winters are severe, consider adding a frost cloth or low tunnel hoop system over your bed. This layer of protection moderates temperature swings, keeps soil from heaving, and extends your season on both ends. For most galvanized steel beds — including Anleolife’s 18″ to 35″ tall options — standard wire hoop kits fit easily over the top edge, making this upgrade simple and affordable.


    Comparing Winter Protection Strategies for Raised Beds

    Choosing the right winter protection approach depends on your climate zone, bed size, and how actively you want to manage your garden in the off-season. Here’s a practical comparison of the three most common strategies:

    Comparison Dimension Mulch + Compost Only Cover Crop System Low Tunnel / Frost Cloth
    Best For Zones 6–8, mild winters Zones 5–8, growers who want spring fertility boost Zones 3–6, severe or unpredictable winters
    Effort Required Low (one-time application) Medium (seeding, termination in spring) Medium-High (setup and ventilation management)
    Soil Health Impact High — feeds microbes, retains moisture Very High — fixes nitrogen, builds organic matter Moderate — protects structure but adds less biology
    Cost Low ($10–25 per bed) Low–Medium ($15–35 per bed including seed) Medium–High ($30–80+ per bed for hoops and fabric)
    Extends Growing Season ❌ ❌ ✅
    Prevents Nutrient Leaching ✅ ✅ ❌
    Protects Steel Structure ❌ (soil protection only) ❌ (soil protection only) ✅ (moderates freeze-thaw on bed walls)
    Works With All Bed Sizes ✅ ✅ ✅ (sized to bed dimensions)

    Most experienced raised bed gardeners in temperate climates choose a combination approach: mulch and compost for soil biology, a cover crop if timing allows, and frost cloth for the coldest weeks of the year.


    Detailed Winter Care Guide: Everything You Need to Know

    Preparing Your Galvanized Steel Bed for Cold Weather

    Your galvanized steel raised garden bed is engineered for durability, but a few targeted steps will ensure it emerges from winter without any degradation in performance or appearance.

    Inspect all hardware and connections. Before the ground freezes, go through each bed and check that corner brackets are tight, bolts are secure, and panels are sitting flush. Anleolife’s modular raised garden bed systems use interlocking panels and stainless-resistant hardware, but soil movement over a growing season can occasionally work connections loose. A quick tighten with a wrench takes minutes and prevents panels from shifting under the weight of frozen soil.

    Check for surface scratches or abrasion. While the galvanized coating on Anleolife beds is robust enough to last 20 years, surface scratches can expose raw steel in lower-quality products. If you notice any bright silver scratches on your bed’s coating, apply a small amount of cold galvanizing compound — available at hardware stores — to protect the area through winter.

    Leave drainage unobstructed. Raised beds are designed to drain freely, which is one of their biggest advantages over in-ground gardens. Before winter, check that the base of your bed has good drainage and that nothing has accumulated around the exterior that might dam standing water against the metal walls. Prolonged water pooling against steel, even galvanized steel, can accelerate localized weathering over many seasons.

    Consider a breathable bed cover for aesthetics and protection. Many gardeners use a simple burlap wrap or canvas cover around the outside of freestanding beds during deep winter. This isn’t structurally necessary for galvanized steel, but it can reduce temperature swings on the metal walls, which helps soil temperature remain more stable — and it looks tidy in the garden landscape.

    Building Soil Health Through the Winter Months

    The soil inside your raised bed is arguably more important than the structure holding it. Winter is the perfect time to feed, protect, and restore your soil ecosystem so it’s firing on all cylinders when you plant in spring.

    Layer in compost generously. A 2–4 inch top-dressing of finished compost or aged manure is the most universally effective winter soil treatment. This layer does triple duty: it feeds the soil microbial community, it moderates temperature swings, and it slowly releases nutrients as it breaks down over winter and early spring. For large beds like the Anleolife 12×3 ft or 8×4 ft models, budget for 3–5 cubic feet of compost per bed.

    Plant a cover crop for maximum soil benefits. Cover crops are one of the most underused tools in the home gardener’s toolkit. Winter-hardy varieties like winter rye (Secale cereale), hairy vetch, or crimson clover can be direct-seeded into your raised bed as late as 6 weeks before your first frost date. These plants protect soil from erosion, suppress weeds, fix atmospheric nitrogen (in the case of legumes), and add significant organic matter when tilled in spring. For shorter raised beds in the 18″ tall range, cover crops work especially well since the bed walls protect tender seedlings from desiccating winds.

    Apply a mulch layer over bare soil. If cover cropping isn’t practical for your situation, a 3–4 inch layer of straw, shredded leaves, or wood chips is the next best option. Straw is preferred by many gardeners because it’s light, allows air exchange, and breaks down to add organic matter by spring. Avoid whole leaves from trees like black walnut, which can release growth-inhibiting compounds. Shredded leaves from oaks, maples, and elms are excellent mulch material.

    pH and nutrient amendments. Winter is a great time to address soil pH imbalances, because amendments like agricultural lime (to raise pH) or elemental sulfur (to lower pH) work slowly and benefit from months to react with soil chemistry. Test your soil in late fall, and apply amendments based on results so they’re fully integrated by planting season.

    Protecting Specific Bed Types Through Winter

    Anleolife offers a range of raised garden bed heights and configurations, and winter care does vary slightly by bed type:

    18″–24″ tall standard beds are the most common and benefit from all the strategies outlined above. Their moderate height means soil temperatures stay relatively stable, and they’re easy to cover with standard frost cloth.

    Extra tall and waist-high beds (24″–35″ tall) have more soil volume, which actually provides better natural insulation against temperature extremes. However, their height also means they’re more exposed to wind-driven cold. Wrapping the exterior with burlap in exposed locations is a smart addition for these taller designs.

    Modular raised garden beds that are configured in L-shapes or multi-unit arrangements trap slightly more heat between units, which is a natural advantage in cold climates. Make sure connecting hardware is checked for tightness before the freeze.

    Round raised garden beds, like the Anleolife 18″ Tall 48″ Wide round model, have no corners for wind to penetrate and tend to maintain more uniform soil temperatures. A single frost cloth draped over the top is usually sufficient protection.

    Winter mulching raised garden bed with straw layer and frost cloth tunnel
    ALT: Raised garden beds in a backyard covered with straw mulch and frost cloth tunnel for winter protection from freezing temperatures


    Advanced Winter Garden Bed Strategies: Beyond the Basics

    Using Cold Frames and Low Tunnels to Extend Your Season

    For gardeners who don’t want to fully shut down their raised beds in winter, cold frames and low tunnel systems are game-changers. A simple low tunnel using 9-gauge wire hoops and 4-mil clear polyethylene film can keep soil temperatures 10–15°F warmer than ambient air, which is often enough to overwinter hardy greens like kale, spinach, mache, and arugula through Zone 6 winters.

    The key to success with tunnels on raised beds is ventilation. On sunny winter days, temperatures inside a closed tunnel can spike to 80°F+ even when outside temperatures are near freezing. Open the ends of your tunnel during the day and close them at night to prevent overheating and condensation-related disease.

    Common Misconceptions About Winter and Galvanized Steel

    Myth: Galvanized steel beds will rust through in a few cold winters.
    Reality: Hot-dip galvanized steel is specifically engineered for outdoor exposure to moisture, temperature extremes, and UV. Anleolife beds are rated for a 20-year lifespan precisely because the galvanization process creates a zinc layer that actively resists rust formation, even through decades of freeze-thaw cycling.

    Myth: You should empty your raised bed soil in winter.
    Reality: Removing and storing your raised bed soil is unnecessary and actually counterproductive. The overwintering soil ecosystem — including beneficial fungi, bacteria, and invertebrates — is an asset you’ve built up over the growing season. Removing soil destroys this community and forces you to rebuild it from scratch.

    Myth: Frozen soil means your garden is “dead” until spring.
    Reality: Soil biology slows but doesn’t stop in winter. Fungal networks remain active, earthworms retreat deeper and continue aerating lower layers, and slow decomposition of organic matter continues even at near-freezing temperatures. Your winter soil amendments are actively working even when you can’t see it.

    Coordinating Winter Bed Care With Your Overall Garden Plan

    If you’re managing multiple raised beds in different sizes — for example, combining Anleolife’s 8×4 ft heavy-duty beds for vegetables with smaller 4×1.5 ft waist-high beds for herbs — it makes sense to coordinate your winter treatments. Batch your compost application across all beds in a single afternoon. Schedule your structure inspection as one circuit around the entire garden. This efficient approach makes winterizing feel manageable rather than overwhelming, even for gardeners with extensive setups.


    Frequently Asked Questions FAQ

    Q1: How do I know if my galvanized steel raised garden bed needs extra winter protection in my climate zone?

    The best indicator is your USDA Plant Hardiness Zone. In Zones 3–5, where temperatures regularly drop below -10°F, extra protection like frost cloth tunnels and generous mulching is strongly recommended. In Zones 6–7, a compost top-dressing and straw mulch is typically sufficient. In Zones 8 and above, your galvanized bed needs minimal winter protection, and you may be able to continue growing cold-hardy crops year-round. Check your local extension service for zone-specific guidance on freeze depth and duration.

    Q2: Is it safe to leave compost or wet organic material in my galvanized steel bed over winter without damaging the metal?

    Yes, absolutely. Galvanized steel is specifically designed to resist corrosion even when in prolonged contact with moist organic material. Anleolife’s beds use hot-dip galvanization, which creates a molecularly bonded zinc layer that performs reliably for up to 20 years under normal garden conditions — including contact with wet compost, soil, and seasonal moisture. The zinc coating actually forms a stable patina over time that further enhances its weather resistance. There is no need to remove soil or organic material from your bed during winter.

    Q3: How much time and money does it cost to properly winterize a raised garden bed?

    For most gardeners, winterizing a single raised bed takes 45–90 minutes and costs between $15–$50 depending on whether you’re purchasing compost, mulch, or frost cloth. A bag of straw mulch typically runs $8–12 and covers one or two standard-sized beds. A cubic foot of finished compost costs $6–15 at garden centers, though home composters can dramatically reduce this cost. Frost cloth and hoop kits for a single 8×4 ft bed run $25–45. These are one-time or low-recurring costs that pay back in improved spring fertility and extended bed lifespan.


    Summary

    Winter raised garden bed care comes down to three fundamental priorities: protect your structure, feed your soil, and plan for spring. A well-maintained galvanized steel raised garden bed — especially one designed for 20-year longevity like Anleolife’s lineup — can serve your family through hundreds of growing seasons with just a modest annual investment of time and attention.

    Here are your key takeaways:

    • Inspect and tighten your bed structure before the ground freezes so freeze-thaw cycles don’t compound minor issues into major repairs
    • Top-dress with compost and mulch to protect soil biology, prevent nutrient leaching, and build fertility for spring planting
    • Use cover crops or frost cloth tunnels for maximum soil health and season extension if your growing zone and schedule allow

    The payoff is real: gardeners who properly winterize their raised beds consistently report better spring soil quality, fewer pest and disease problems in early plantings, and noticeably higher yields throughout the growing season. It’s one of the highest-return investments in your gardening year.

    As you head into the colder months, remember that every layer of compost you add, every bolt you tighten, and every square foot of mulch you spread is compounding interest in next year’s harvest.

    Start Your Winter Prep With Anleolife

    Anleolife supports your garden through every season — and that includes winter. With a nationwide U.S. warehouse network strategically located in California, Texas, Florida, New York, Illinois, and Washington, your orders arrive in just 3–8 business days, so you’re never waiting long to get the supplies or beds you need.

    Our products are available across all major platforms — Amazon, Walmart, Home Depot, Lowe’s, Wayfair, and directly at Anleolife.com — so consistent quality and responsive after-sales support are always within reach.

    Whether you’re expanding your growing space with a new 30″ Extra Tall 10×3 ft heavy-duty bed or adding a compact 35″ Waist-High 4×1.5 ft model for herbs and greens, Anleolife’s modular design grows with you — from your first garden bed to a full planting-and-raising ecosystem that includes chicken coops, rabbit hutches, and decorative pathway systems.

    We understand that an ideal garden isn’t built overnight. It’s grown, season by season, with the right tools and the right support. Let’s grow together.


    References

    1. United States Department of Agriculture (USDA). “USDA Plant Hardiness Zone Map.”
      https://planthardiness.ars.usda.gov/
    2. Penn State Extension. “Cover Crops for Home Gardeners.”
      https://extension.psu.edu/cover-crops-for-home-gardeners
    3. University of California Agriculture and Natural Resources (UC ANR). “Soil Management and Cover Crops.”
      https://ucanr.edu/
    4. National Gardening Association. “Winterizing the Vegetable Garden.”
      https://garden.org/
    5. Cornell Cooperative Extension. “Raised Bed Gardening.”
      https://cce.cornell.edu/

    Note: Standards and recommendations may be updated. Please check the latest official documents or consult a local cooperative extension advisor for region-specific guidance.


    About Anleolife

    Anleolife is a leading outdoor garden solutions provider in North America, dedicated to offering a full-scenario product ecosystem for home gardening enthusiasts, covering planting, raising, and garden beautification. Since its founding, we have upheld our brand mission, “Made for Garden Life,” continuously innovating products and optimizing services to help hundreds of thousands of users upgrade their gardens, reconnect with nature, and enjoy a better garden lifestyle.


  • What Is a Chicken Tunnel? The Complete Guide to Predator-Proof Poultry Runs

    Chicken tunnel attached to a backyard coop with hens foraging safely in a predator-proof wire run
    ALT: Predator-proof chicken tunnel connected to backyard coop allowing hens to forage safely in enclosed wire run

    What Is a Chicken Tunnel and Why Every Backyard Flock Owner Needs One

    Key Conclusion: A chicken tunnel—also called a “chunnel”—is a narrow, enclosed wire passageway that lets your flock roam, forage, and exercise while remaining fully protected from ground and aerial predators. Whether you’re integrating your birds with a raised bed garden layout, connecting two separate enclosures, or simply giving hens access to fresh grass without free-ranging risks, a well-designed chicken tunnel is one of the smartest, most cost-effective upgrades a backyard poultry keeper can make.

    Backyard poultry keeping has exploded in popularity across North America over the past decade, and with that growth comes a persistent challenge: how do you give chickens access to fresh ground, sunlight, and natural foraging opportunities without exposing them to foxes, hawks, raccoons, and the dozens of other predators that view your flock as a free lunch?

    The chicken tunnel solves that problem elegantly. It connects your coop to a garden, a second run, or simply a stretch of lawn—giving birds enrichment and exercise while you retain complete control over where they go and what gets protected. In this complete guide, you’ll learn exactly what a chicken tunnel is, how to design and build one, how to predator-proof it at every level, and how to integrate it beautifully with raised bed garden layouts so your chickens actually improve your growing space rather than destroy it.


    Who Should (and Shouldn’t) Use a Chicken Tunnel

    ✅ Applicable Scenarios:

    • Small suburban flocks (2–12 birds) that need safe outdoor access in yards with known predator pressure from raccoons, foxes, hawks, or neighborhood dogs
    • Gardeners who keep chickens and want to route birds along garden pathways or between raised beds to let them eat pests and weeds without scratching up planted areas
    • Multi-run setups where a permanent coop needs to connect to a seasonal or rotating pasture area without requiring daily supervised free-ranging
    • Families with children or pets who want a physical separation between the flock and the rest of the yard for safety and hygiene reasons
    • Urban and suburban micro-gardeners working within city ordinance limitations who need a compact, tidy solution that satisfies both animal welfare and neighbor aesthetics

    ❌ Not Applicable/Cautions:

    • Very large flocks (50+ birds) where the volume of birds would overwhelm a narrow tunnel system—dedicated large-scale pasture runs are more appropriate
    • Areas with extremely high predator density (e.g., active coyote territories) unless the tunnel is constructed from heavy-gauge hardware cloth AND has a full apron buried underground—standard poultry netting is insufficient
    • Poorly drained, low-lying areas where tunnel floors can become waterlogged and create respiratory disease risk or parasite buildup
    • Gardeners using systemic pesticides or synthetic herbicides on lawn areas adjacent to the tunnel, as chickens will ingest treated plant material

    The Rising Popularity of Chicken Tunnels and Integrated Garden Systems

    Backyard chickens are no longer just a rural tradition. According to the American Pet Products Association, an estimated 13 million U.S. households now keep backyard poultry, a number that has more than doubled since 2010. Alongside that growth, the concept of integrated garden-raising systems—where livestock and planting zones work together rather than apart—has become one of the most discussed topics in the urban homesteading community.

    The traditional model of keeping chickens confined to a static run creates several compounding problems: bored birds develop behavioral issues like feather pecking, the run floor becomes a bare, compacted, bacteria-laden patch within weeks, and the gardener misses out on the tremendous pest-control and fertilization benefits chickens can provide.

    The chicken tunnel, sometimes called a “chunnel” (chicken + tunnel), emerged as a practical middle-ground solution pioneered by small-scale homesteaders and popularized through permaculture design circles in the 2000s and 2010s. The concept is simple: instead of giving birds unrestricted access to your entire yard or garden (where they will inevitably destroy what you’re trying to grow), you create a dedicated corridor that routes them exactly where you want them—along garden perimeters, between beds, through a cover-crop area, or simply around the yard’s edge.

    Modern chicken tunnels range from simple DIY hoops covered in poultry netting to sophisticated modular systems with hardware cloth walls, wooden frames, and decorative finishes that complement garden aesthetics. The key design principles remain consistent regardless of scale: security against predators, adequate ventilation and light, easy cleaning access, and thoughtful integration with the surrounding landscape.

    For gardeners who use raised beds—particularly metal raised garden beds like those in the Anleolife lineup—chicken tunnels offer a particularly elegant synergy. You can route the tunnel along the outside perimeter of your bed layout, allowing birds to clean up fallen debris, eat soil insects, and deposit nitrogen-rich manure in pathways, all while the raised bed walls prevent them from scratching into your planted soil. This is integrated garden design at its most practical.


    Designing and Building a Predator-Proof Chicken Tunnel: Step-by-Step

    Three-Step Quick Start

    Step 1: Plan Your Route and Measure

    Before buying a single roll of wire, walk your yard and sketch the path you want the tunnel to follow. Measure total length, note any corners or grade changes, and identify where the tunnel will connect to your coop or run. Standard tunnel width is 18–24 inches; height varies from 18 inches (crawl-style) to 36 inches (walk-through for maintenance). Allow 30–60 minutes for this planning phase—it will save hours of rework later.

    Step 2: Choose Your Frame and Wire Material

    Select your framing method (PVC hoops, cattle panel arches, or wooden frames) and your wire type. For true predator protection, ½-inch hardware cloth (19-gauge minimum) is the only acceptable choice for walls and top. Standard chicken wire keeps birds in but does not keep determined predators out—raccoon paws can reach through 1-inch hex wire and pull birds apart. Budget 2–4 hours for material sourcing and cutting.

    Step 3: Install, Secure, and Test

    Assemble frames at 2–3 foot intervals, attach hardware cloth with fencing staples or hog rings, bury or pin a 12-inch apron of hardware cloth along the ground perimeter to deter digging predators, and connect endpoints securely to existing structures. Test every connection point by applying hand pressure—if you can pull wire away from the frame easily, predators can too. Plan a full day for a standard 20-foot tunnel installation.


    Comparing the Three Most Common Chicken Tunnel Build Methods

    Choosing the right construction approach depends on your budget, skill level, permanence needs, and aesthetic goals. Here’s how the three primary methods stack up:

    Comparison Dimension PVC Hoop Tunnel Cattle Panel Arch Wooden Framed Run
    Material Cost (20 ft) $40–$80 $80–$150 $150–$400+
    Predator Resistance Low–Medium (with hardware cloth) High (rigid structure) High (with hardware cloth)
    DIY Skill Required Minimal Low–Medium Medium–High
    Permanence Temporary/Seasonal Semi-permanent Permanent
    Weight/Portability Very Lightweight Heavy Very Heavy
    Aesthetic Appeal Low Medium High
    Maintenance Required Low Low Medium (wood rot prevention)
    Best For Budget builds, seasonal use Strong, long-lasting runs Decorative, integrated gardens

    The cattle panel arch method has become the community favorite for most backyard setups because it offers structural rigidity that resists both predator pressure and weather loading (snow, wind), can be covered with hardware cloth for genuine security, and lasts for many years with minimal maintenance.


    Deep Dive: Every Predator-Proofing Detail That Matters

    Understanding the Predator Threat Matrix

    Effective chicken tunnel design starts with knowing your enemy. Backyard flock predators fall into three attack categories:

    Ground predators that dig: Foxes, raccoons, minks, weasels, and skunks will attempt to dig under tunnel walls. The solution is a hardware cloth apron—a 12-inch-wide strip of wire that extends horizontally outward from the base of the tunnel wall, buried 2–4 inches underground or pinned flat to the ground surface (grass will grow through it). The L-shape this creates defeats any digging attempt because predators instinctively dig straight down at a barrier rather than backing up to dig further out.

    Ground predators that push, pull, and manipulate: Raccoons in particular are frighteningly dexterous. They can unlatch simple hook-and-eye closures, reach through wire, and apply sustained pulling force to weak connection points. Use carabiner clips or locking hardware on all doors and access panels. Ensure hardware cloth is attached with hog rings every 4–6 inches rather than just at edges—predators exploit gaps.

    Aerial predators: Hawks and owls require a fully enclosed top. An open-top tunnel is not predator-proof. Hardware cloth or welded wire on the roof is essential. If your tunnel runs under dense tree cover, threat is slightly reduced, but never eliminated.

    Wire Selection: Why Hardware Cloth Is Non-Negotiable

    This point cannot be overstated: standard hexagonal poultry netting (“chicken wire”) is not predator-proof fencing. It is designed only to contain chickens, not to exclude predators. The wire gauge is too light (it can be torn by a determined raccoon), the hex openings are large enough for small mustelids like minks and weasels to squeeze through, and it corrodes relatively quickly.

    ½-inch hardware cloth (also called welded wire mesh) made from galvanized 19-gauge or heavier wire is the baseline for any tunnel claiming predator resistance. For areas with documented mink or weasel activity, step up to ¼-inch hardware cloth, which is denser and closes off the smaller opening sizes these animals can exploit.

    Hardware cloth is more expensive upfront—roughly 3–5 times the cost of chicken wire by linear foot—but the cost of a single predator attack (losing your flock, plus replacement birds) far exceeds any savings from cheaper wire.

    Ventilation, Drainage, and Bird Welfare Inside the Tunnel

    A secure tunnel is worthless if birds won’t use it or if it becomes a disease vector. Consider these welfare elements:

    Light and air flow: Wire construction naturally provides excellent ventilation, but if you add solid roof panels for rain protection, ensure at least 30% of the roof area remains open wire to prevent ammonia and moisture buildup.

    Flooring: Most tunnels are built directly on grass, which is ideal—birds get natural foraging material and the ground absorbs waste. In high-traffic zones, consider rotating the tunnel position seasonally to allow grass recovery. Never use treated lumber as ground contact framing where birds will be scratching and pecking.

    Width and comfort: A minimum interior width of 18 inches allows most standard breeds to navigate comfortably, but 24 inches is preferable if birds will spend extended time in the tunnel rather than just passing through.

    Integrating Chicken Tunnels with Raised Garden Beds

    This is where backyard chicken keeping and kitchen gardening create a genuinely beautiful feedback loop. Routing a chicken tunnel along the perimeter or between rows of raised garden beds allows birds to:

    • Eat soil-dwelling pests (grubs, beetles, fly larvae) that fall or crawl to pathway areas
    • Consume fallen fruit, spent plant material, and crop debris—reducing disease pressure in beds
    • Deposit manure in pathways where it can be composted or watered in as liquid fertilizer
    • Scratch and weed pathway areas without ever accessing planted bed soil

    Anleolife’s galvanized steel raised garden beds are particularly well-suited to this kind of integration. With wall heights ranging from 18 inches up to 35 inches (waist-high), the beds create natural physical barriers that keep chickens in pathways. The galvanized steel construction that gives these beds their 20-year lifespan also means they won’t be damaged by the humidity and manure exposure that comes with having chickens working nearby.

    For a visually cohesive and highly functional setup, consider this layout:

    • Two 8×4 ft raised beds positioned parallel, 24–30 inches apart
    • A chicken tunnel running the full length between them
    • Tunnel connected at one end to the coop run, with a latched door at the far end for your access

    This arrangement lets you open the tunnel access door when you want birds to work the pathway between beds, then close it when you’re planting or harvesting. The birds benefit from foraging enrichment; your garden benefits from biological pest control and organic fertilization.

    Chicken tunnel running between two galvanized raised garden beds with hens foraging in the pathway
    ALT: Predator-proof chicken tunnel integrated between two galvanized steel raised garden beds with hens foraging safely in the connecting pathway


    Advanced Considerations: Seasonal Use, Rotation, and Scaling Up

    Managing Seasonal Transitions

    In cold-weather climates, you’ll want to assess whether your tunnel remains functional year-round or becomes a seasonal installation. Cattle panel and wooden-framed tunnels with hardware cloth can remain in place through winter with minimal modification. Lightweight PVC hoop tunnels may need to be removed or reinforced to handle snow loading.

    One often-overlooked cold-season benefit: routing chickens through a tunnel into a greenhouse or high tunnel during winter gives birds warmth and light while their body heat and CO₂ slightly elevate greenhouse temperatures—a true symbiotic arrangement.

    Rotation Systems: The “Chicken Tractor Tunnel” Approach

    Rather than a fixed installation, some gardeners build modular tunnel sections that can be rearranged seasonally. In spring, route the tunnel through areas you want cleared and fertilized before planting. In summer, shift it to perimeter paths. In fall, route birds through recently harvested bed areas for cleanup duty. This rotation approach maximizes the fertilization benefit while preventing any single area from becoming overworked.

    Common Misconceptions Addressed

    “Chicken wire is fine if you stay home during the day”: Predators don’t observe business hours. Diurnal predators including hawks, foxes, and domestic dogs can attack at any hour. A tunnel that is only hardware-cloth-secure is safe; one that “should be okay” is a liability.

    “My dog keeps predators away so the tunnel doesn’t need to be fully enclosed”: Dogs are wonderful deterrents, but they sleep, get distracted, and are sometimes confined indoors. Build your tunnel as if your dog doesn’t exist—the hardware cloth costs less than a single replacement hen.

    “A narrow tunnel stresses chickens”: Chickens are naturally inclined to move through narrow spaces—it mirrors their instinct to move through underbrush. Most flocks acclimate to a properly sized tunnel within 2–3 days, especially if food motivation is used to introduce them.


    Frequently Asked Questions FAQ

    Q1: How do I get my chickens to actually use the tunnel?

    Start by placing treats (scratch grains, mealworms) just inside the tunnel entrance for 2–3 days while observing. Once birds are comfortable entering, gradually place treats further in. Within a week, most flocks will navigate the tunnel independently. Avoid forcing birds through initially—stress-based introductions create lasting reluctance. For particularly hesitant flocks, a light at the far end of a longer tunnel can help, as chickens are naturally drawn toward light sources.

    Q2: Is hardware cloth really necessary, or can I use chicken wire to save money?

    Hardware cloth is genuinely necessary for predator protection—this is not marketing upsell language. Standard chicken wire has openings large enough for weasels and minks to enter, is light enough for raccoons to tear, and does not protect against any digging predator. The cost difference for a 20-foot tunnel is roughly $30–$60 more for hardware cloth versus chicken wire. Given that a single predator event can kill an entire flock and replacement birds cost $15–$40 each, hardware cloth is always the economical choice.

    Q3: How long does it take to build a basic chicken tunnel, and what does it cost?

    A basic 20-foot cattle panel chicken tunnel with hardware cloth can be completed by one person in 4–6 hours and costs approximately $100–$180 in materials depending on local pricing. A more elaborate wooden-framed tunnel with decorative elements can take a full weekend and run $300–$500. Long-term, both are excellent investments—properly constructed hardware cloth tunnels last 10–15+ years with minimal upkeep, and the flock health, reduced predator losses, and garden productivity benefits generate ongoing returns.


    Summary

    A well-designed chicken tunnel is one of the highest-value additions any backyard flock owner can make to their setup. Let’s recap the three core takeaways:

    1. Security is the non-negotiable foundation. Hardware cloth, buried aprons, locking hardware, and a fully enclosed structure are not optional upgrades—they are the baseline for any tunnel that genuinely protects your birds. Every shortcut in this area is a future predator event waiting to happen.

    2. Integration with your garden is where the magic happens. Routing chickens through pathways between raised beds creates a closed-loop system where birds provide pest control, weed management, and natural fertilization—and your garden provides them with enrichment and fresh forage. It’s one of the most elegant examples of regenerative gardening design available to the home grower.

    3. Start simple and scale with your needs. A 20-foot cattle panel tunnel connected to an existing coop run is an achievable weekend project that transforms your flock’s welfare and your garden’s productivity. From there, you can expand modularly as your confidence and enthusiasm grow.

    Whether you’re a seasoned chicken keeper looking to upgrade your run setup, or a gardener who recently added a small flock and is searching for a way to make the two systems work together, the chicken tunnel is your bridge between them.


    Start Building Your Integrated Garden-Raising System with Anleolife

    Anleolife’s nationwide U.S. warehouse network—strategically located in California, Texas, Florida, New York, Illinois, and Washington—ensures delivery within 3–8 business days, so your garden upgrade plans never have to wait through long shipping delays.

    Our products are available on major e-commerce platforms including Amazon, Walmart, Home Depot, Lowe’s, and Wayfair, as well as directly at Anleolife.com, providing consistent quality assurance and reliable after-sales service wherever you prefer to shop.

    Anleolife’s three core scenarios—Planting (metal raised garden beds, soil systems), Raising (chicken coops, rabbit hutches), and Beautification (decorative accessories, pathway systems)—mean you can source everything needed for a fully integrated garden-raising system from a single trusted brand.

    Our galvanized steel raised garden beds are purpose-built for exactly the kind of integrated layouts described in this guide. Built to last 20 years and available in a wide range of sizes—from compact 4×4 ft beds to expansive 12×3 ft configurations and waist-high 35-inch-tall options—they create the permanent infrastructure around which your chicken tunnel system can be designed and built.

    We understand that an ideal garden is not built overnight, but gradually improved over time. Our modular product design allows flexible expansion based on your needs—from your first 8×4 raised bed to a fully integrated planting-and-raising ecosystem. We grow with you every step of the way.

    👉 Shop Anleolife Raised Garden Beds and Raising Solutions at Anleolife.com


    References

    1. American Pet Products Association. “APPA National Pet Owners Survey: Backyard Poultry Statistics”.
      https://www.americanpetproducts.org/research/industry-trends-and-statistics
    2. University of California Agriculture and Natural Resources. “Backyard Poultry: Predator Control and Housing”.
      https://ucanr.edu/sites/poultry/
    3. Penn State Extension. “Predator Management for Small and Backyard Poultry Flocks”.
      https://extension.psu.edu/predator-management-for-small-and-backyard-poultry-flocks
    4. USDA National Agricultural Library. “Small-Scale and Backyard Poultry Production Resources”.
      https://www.nal.usda.gov/farms-and-agricultural-production-systems/small-scale-and-backyard-poultry
    5. Oregon State University Extension Service. “Raising Chickens in Your Backyard: Predator-Proofing Your Flock”.
      https://extension.oregonstate.edu/animals-livestock/poultry

    Note: Resource content and URLs may be updated over time. Please verify the latest information directly through official sources or consult a local agricultural extension advisor for guidance specific to your region.


    About Anleolife

    Anleolife is a leading outdoor garden solutions provider in North America, dedicated to offering a full-scenario product ecosystem for home gardening enthusiasts, covering planting, raising, and garden beautification. Since its founding, we have upheld our brand mission, “Made for Garden Life,” continuously innovating products and optimizing services to help hundreds of thousands of users upgrade their gardens, reconnect with nature, and enjoy a better garden lifestyle.


  • Raised Garden Bed Size Chart: How Many Plants Fit in an 8×4 vs 12×3 ft Bed?

    Raised Garden Bed Size Chart showing 8x4 and 12x3 ft beds with plant spacing layout
    ALT: Raised garden bed size chart comparing 8×4 and 12×3 ft beds with plant spacing and layout guide

    Raised Garden Bed Size Chart: Finding Your Perfect Fit for Maximum Harvests

    Key Conclusion: Choosing the right raised bed size is the single most impactful decision you’ll make before planting season. Whether you’re planning a raised bed garden layout for tomatoes, herbs, or mixed vegetables, understanding exactly how many plants fit in an 8×4 vs 12×3 ft bed — and why spacing matters — will directly determine your harvest volume, soil health, and long-term gardening success. A well-designed raised bed planting layout turns limited space into a high-yield growing machine, and a smart raised bed layout plan ensures every square inch works for you.

    Getting the math right before you buy or build your raised bed saves time, money, and a lot of replanting frustration. Two of the most popular bed dimensions — the 8×4 ft and the 12×3 ft — actually offer identical square footage (32 sq ft), yet they perform very differently depending on what you grow and how you tend your garden. This guide breaks down everything you need to know: plant counts, spacing logic, bed shape trade-offs, and how to match your bed size to your gardening goals.


    Who This Raised Bed Size Guide Is For

    ✅ Applicable Scenarios:

    • First-time gardeners who want to maximize their harvest without overplanting or wasting space
    • Urban micro-gardeners working with limited backyard or patio footprints who need to make every square foot count
    • Home growers planning a multi-bed system and trying to decide between rectangular layouts vs. elongated rows
    • Empty nesters and retirees who prefer a waist-high or manageable bed size that reduces bending and physical strain
    • Eco-conscious families growing their own food and wanting a data-driven planting plan

    ❌ Not Applicable/Cautions:

    • This guide focuses on standard 8×4 and 12×3 ft bed comparisons; it does not cover circular, tiered, or specialty-shaped beds in depth
    • Spacing recommendations are general guidelines — always cross-reference with specific seed packet or seedling instructions, as variety matters significantly
    • Raised bed depth (height) also affects plant health and root space; this guide primarily addresses surface area and layout planning

    Why Bed Dimensions Matter More Than You Think

    Most gardeners start their journey by asking “what should I plant?” But experienced growers know the smarter first question is “what size bed do I need?” The dimensions of your raised bed define everything downstream — how many plants you can grow, which crops make sense, how easily you can reach the center, and how efficiently your watering and soil systems work.

    The popularity of raised bed gardening has surged in recent years. According to the National Gardening Association, food gardening participation in the U.S. reached record levels post-2020, with millions of new home growers entering the hobby. Among them, raised bed gardening consistently ranks as the preferred method because it offers superior drainage, fewer weeds, earlier spring planting, and better soil control than in-ground beds.

    Within this growing community, the 8×4 ft raised garden bed and the 12×3 ft raised garden bed are two of the best-selling configurations — and they’re often compared directly because both measure exactly 32 square feet. But shape is not neutral. A 3-foot-wide bed means you can comfortably reach the center from either side (18 inches per side), while a 4-foot-wide bed pushes that reach to its practical maximum. An 8-foot length keeps the bed compact and easy to navigate around, while a 12-foot length creates a long row ideal for succession planting.

    Understanding these nuances before you commit to a bed size — or before you plan your raised bed garden layout — is the difference between a garden that works effortlessly and one that creates constant frustration.

    At Anleolife, both the 8×4 ft and 12×3 ft configurations are available in multiple heights and materials, including galvanized steel and rust-resistant options, all built to last up to 20 years. Whether you’re setting up your first bed or expanding an existing system, getting the sizing right from the start pays dividends every single season.


    Raised Garden Bed Size Chart: Step-by-Step Planning Guide

    Three Steps to Plan Your Raised Bed Layout Before You Buy

    Step 1: Determine Your Reach and Access Needs

    Before anything else, stand at the edge of your intended garden area and extend your arm forward. Most adults can comfortably reach 18–24 inches without leaning uncomfortably. A 4-foot-wide bed (like the 8×4) requires access from both sides; a 3-foot-wide bed (like the 12×3) can be reached comfortably from either side. If your bed will be placed against a wall, fence, or structure, always choose a width of 2–3 feet max. This step takes about 5 minutes and saves you from months of awkward harvesting. Factor in whether you’ll need knee room if working from a seated position or wheelchair.

    Step 2: Inventory Your Target Plants and Their Spacing Requirements

    Write down every crop you want to grow this season. Next to each, note its recommended in-row spacing and between-row spacing. For example: tomatoes need 18–24 inches, lettuce needs 6–8 inches, carrots need 3–4 inches, and basil can go as close as 6 inches. Using the Square Foot Gardening method (popularized by Mel Bartholomew), divide each plant’s spacing requirement into a 1-square-foot grid. This tells you exactly how many of each plant fit per square foot — and from there, multiplying by 32 (total sq ft) gives your bed’s maximum plant capacity. Allow 20–30 minutes to complete this inventory before moving to the next step.

    Step 3: Match Plant Needs to Bed Shape

    Once you know what you’re growing, think about how plants will be arranged spatially. Tall plants (like corn, trellised tomatoes, or pole beans) should go on the north side of the bed to avoid shading shorter crops. Deep-rooted vegetables (like carrots or parsnips) benefit from taller beds (24–30 inches). Sprawling plants like squash or melons are often better in wider beds. Long, narrow beds like the 12×3 are excellent for single-variety rows — herbs, greens, or cut flowers. Compact square-ish beds like the 8×4 excel at multi-crop mixed plantings. This matching step takes about 15 minutes and directly shapes your entire raised bed planting layout.


    8×4 vs 12×3 Raised Garden Bed: Comparison Chart

    Both the 8×4 and 12×3 configurations offer 32 square feet of growing space — but how that space is shaped changes everything about your gardening experience. Here’s a side-by-side comparison across key dimensions to help you choose the right raised bed layout for your needs:

    Comparison Dimension 8×4 ft Raised Bed 12×3 ft Raised Bed Key Takeaway
    Total Growing Area 32 sq ft 32 sq ft Equal growing potential
    Width (Reach) 4 ft (needs 2-side access) 3 ft (accessible from one side) 12×3 wins for accessibility
    Length 8 ft 12 ft 12×3 better for row crops
    Best Crop Types Mixed vegetables, multi-variety Herbs, greens, single-variety rows Depends on planting goals
    Max Tomato Plants (24″ spacing) 8 plants 6 plants 8×4 fits more trellised crops
    Max Lettuce Plants (6″ spacing) ~128 heads ~128 heads Equal capacity for small crops
    Max Carrot Plants (3″ spacing) ~512 plants ~512 plants Equal capacity for root crops
    Structural Stability High (shorter length) Moderate (longer sides may bow) 8×4 has structural advantage
    Ideal For Mixed beds, beginners Row planting, single crops Match to your planting style
    Anleolife Product Match 24″ Extra Tall 8×4 ft 24″ Extra Tall 6×3 ft (similar) Multiple heights available

    How Many Plants Fit? The Full Raised Bed Planting Layout Breakdown

    Understanding Square Foot Gardening in a 32 Sq Ft Bed

    The Square Foot Gardening (SFG) method is the most reliable system for calculating plant counts in raised beds. Developed by Mel Bartholomew in the 1970s and popularized through decades of home gardening, SFG divides your bed into 1-foot-by-1-foot squares and assigns each a plant count based on spacing needs.

    Here’s how the math works for common vegetables in a 32-square-foot bed:

    Large plants (1 per sq ft or less):

    • Tomatoes (18–24″ spacing): 8–12 plants in an 8×4 bed; 8–10 in a 12×3
    • Peppers (12–18″ spacing): 12–18 plants
    • Eggplant (18″ spacing): 8–10 plants
    • Broccoli (18″ spacing): 8–10 plants
    • Cabbage (18″ spacing): 8–10 plants

    Medium plants (4 per sq ft):

    • Lettuce (6″ spacing): ~128 heads per 32 sq ft bed
    • Spinach (6″ spacing): ~128 plants
    • Kale (12″ spacing): 32 plants
    • Basil (6–8″ spacing): 64–128 plants
    • Swiss chard (6″ spacing): 64–128 plants

    Small/dense plants (9–16 per sq ft):

    • Radishes (3″ spacing): ~512 plants
    • Carrots (3–4″ spacing): 288–512 plants
    • Beets (4″ spacing): ~288 plants
    • Onions (4″ spacing): ~288 bulbs
    • Garlic (4–6″ spacing): 144–288 cloves

    These numbers are theoretical maximums — in practice, you’ll mix plant sizes and leave pathways or companion planting zones. A realistic mixed-planting strategy for a 32 sq ft bed might include 4 tomato plants, 2 pepper plants, a border of basil, and a section of lettuce for a continuous harvest.

    Shape-Specific Advantages: When to Choose Each

    Choose the 8×4 ft bed when:

    You want to grow a diverse mix of vegetables. The near-square shape allows you to create defined zones within the bed — a tomato corner, an herb border, a lettuce section — without any zone being too far from reach. The 4-foot width allows for two-row planting with a wide central path, and the compact 8-foot length means you’re not walking far to tend the far end.

    The 8×4 is also the better choice for trellising. Vertical growing structures fit naturally at one end of the bed without casting excessive shade over the entire planting area. Anleolife’s 24″ Extra Tall 8×4 ft Galvanized Steel Raised Garden Bed and 30″ Extra Tall 8×4 ft Modular Raised Garden Bed are both excellent options for growers who want depth for root vegetables alongside vertical growing potential.

    Choose the 12×3 ft bed when:

    You’re growing in rows — think herbs along a fence line, a dedicated cut-flower bed, or a succession planting system where you seed a new section every two weeks for continuous harvest. The 3-foot width makes it uniquely easy to access without stepping in, and the 12-foot length creates ample room for multiple succession rows side by side.

    The narrow, long format also works beautifully as a border bed — running along a driveway, pathway, or fence. It visually defines garden space while maximizing planting area. For accessibility, particularly for seniors or gardeners with limited mobility, the 3-foot-wide bed at a 24–30″ raised height is one of the most ergonomically friendly configurations available.

    Mixing Bed Sizes: The Multi-Bed System Approach

    Here’s where experienced gardeners gain a real edge: instead of choosing between an 8×4 and 12×3, they use both in a complementary system. A common layout might include:

    • One 8×4 bed for mixed vegetables, tomatoes, and peppers (the workhorse bed)
    • One 12×3 bed for herbs, greens, and successive salad crops (the continuous harvest bed)
    • One 4×4 or 6×3 bed for root vegetables requiring deep soil (carrots, beets, parsnips)

    This kind of multi-bed planning is where the raised bed garden layout becomes a true garden design exercise. You’re thinking about sunlight flow, watering zones, companion planting relationships, and harvest timing simultaneously.

    Anleolife’s full product lineup supports exactly this kind of modular approach. From the 18″ Tall 12×3 ft Galvanized Steel Raised Garden Bed to the 30″ Extra Tall 10×3 ft Heavy Duty Raised Garden Bed, every size is engineered to integrate seamlessly into a growing system. The galvanized steel construction ensures a lifespan of up to 20 years, meaning the bed you install today becomes a permanent feature of your garden landscape — not something you replace every few seasons.

    Depth Matters Too: Height Recommendations by Crop Type

    While this guide focuses primarily on surface area and layout, bed height is worth addressing because it directly affects how many of these plants will actually thrive:

    Bed Height Best For Anleolife Options
    11–18″ (Standard) Most vegetables, herbs, annuals 18″ Tall 8×4 ft, 18″ Tall 12×3 ft
    24″ (Extra Tall) Root vegetables, deeper-rooting crops 24″ Extra Tall 8×4 ft, 24″ Extra Tall 6×3 ft
    30″ (Waist-High) Accessibility, senior gardeners, back relief 30″ Extra Tall 8×4 ft, 30″ Extra Tall 6×3 ft
    35″ (Premium) ADA-friendly, raised planting tables 35″ Waist-High 4×1.5 ft

    For most home gardeners growing tomatoes, peppers, lettuce, and herbs, an 18–24″ bed depth provides sufficient root space and excellent drainage. For dedicated root vegetable beds (carrots, parsnips), always choose 24″ minimum.

    Detailed raised bed garden layout chart showing plant spacing for 8x4 and 12x3 ft beds with labeled plant zones
    ALT: Raised bed planting layout diagram for 8×4 and 12×3 ft garden beds showing plant counts and spacing zones for vegetables and herbs


    Advanced Tips for Maximizing Your Raised Bed Layout

    Companion Planting in Small Spaces

    One of the most powerful tools for maximizing a 32 sq ft raised bed is strategic companion planting. The classic “Three Sisters” combination (corn, beans, squash) requires at least a 6×6 ft space, but many two-crop combinations work beautifully within an 8×4 or 12×3 bed. Consider:

    • Tomatoes + Basil: Basil reportedly deters aphids and spider mites while enhancing tomato flavor. Plant basil in the 6″ border around tomato plants.
    • Carrots + Onions: Onion scent confuses carrot fly; carrot scent deters onion fly. Interplant alternating rows.
    • Lettuce + Tall Crops: Lettuce tolerates partial shade. Plant it under the shadow of tomatoes or trellised beans to extend your cool-season harvest into summer.

    Common Mistakes in Raised Bed Garden Layout Planning

    Mistake 1: Ignoring sun direction. Always orient your taller plants (north side of the bed in the Northern Hemisphere) so they don’t shade smaller crops. A 12×3 bed running east-west should have tall plants along the north edge.

    Mistake 2: Overplanting in year one. It’s tempting to fill every square foot, but giving plants room to breathe reduces disease pressure, improves air circulation, and often results in higher yields per plant. Start at 80% of maximum plant count and adjust in year two.

    Mistake 3: Ignoring soil volume. A bed with 32 sq ft surface area but only 6″ of depth holds 16 cubic feet of soil — adequate for shallow-rooted crops but insufficient for tomatoes or root vegetables. Always choose bed height intentionally, not just for aesthetics.

    Myth to Debunk: “Bigger beds always mean more food.” In reality, a well-managed 8×4 bed with proper spacing, companion planting, and vertical growing can outperform a poorly managed 12×6 bed. Technique, not just size, drives yield.


    Frequently Asked Questions FAQ

    Q1: How many tomato plants can I fit in an 8×4 raised garden bed?

    Using the standard 18–24 inch spacing recommended for most indeterminate tomato varieties, you can fit 8–12 tomato plants in an 8×4 ft bed (32 sq ft). However, in practice, 4–6 large indeterminate tomatoes or 8–10 compact determinate varieties is a more realistic count that still allows adequate airflow, fertilizer distribution, and trellis support. Always consider vertical growing structures along the north edge of the bed to maximize your raised bed planting layout without crowding.

    Q2: Is a 12×3 ft raised bed better than an 8×4 for small backyard gardens?

    It depends on your priorities. If you have a narrow space along a fence or driveway, the 12×3 ft bed is ideal — its 3-foot width allows you to reach the center from either side without stepping in, and the long format suits row planting and succession planting beautifully. The 8×4 ft bed is better suited to open spaces where you can access all four sides, and it handles mixed multi-crop layouts more intuitively. Both offer 32 sq ft of growing space with equal plant capacity for small crops.

    Q3: How long does a galvanized steel raised garden bed last, and is it worth the investment?

    High-quality galvanized steel raised garden beds, like those from Anleolife, are built to last up to 20 years with proper care. This durability makes them a long-term investment rather than a seasonal purchase. Compared to untreated wood (which can rot within 3–7 years) or plastic beds (which degrade under UV exposure), galvanized steel offers superior longevity and structural integrity. Over a 20-year period, the cost per year is minimal — especially when you factor in the value of homegrown produce and the joy of a well-designed garden that functions beautifully season after season.


    Summary

    Planning your raised bed garden comes down to three core insights:

    1. Shape changes function, even when size stays the same. An 8×4 and a 12×3 bed both offer 32 square feet, but they serve different planting styles. The 8×4 excels at mixed multi-crop layouts and trellised plants; the 12×3 shines for row crops, herbs, and succession planting along narrow spaces.

    2. Spacing math is your most powerful planning tool. Using the Square Foot Gardening framework, you can precisely calculate how many tomatoes, lettuces, carrots, or herbs fit in your exact bed dimension — before you plant a single seed. This prevents waste, overcrowding, and replanting frustration.

    3. Depth and material quality complete the picture. Surface area tells you plant count; bed height tells you root health potential; material quality tells you how long your investment lasts. For a 20-year garden infrastructure, galvanized steel or rust-resistant steel from Anleolife gives you the stability to build a truly long-term garden system.

    Your next step: measure your available space, list your priority crops, and choose a bed size that fits both your physical space and your gardening ambitions. Start with one bed, fill it intentionally, and expand as you grow.


    Start Growing Smarter with Anleolife

    Nationwide U.S. warehouse network: Strategically located in California, Texas, Florida, New York, Illinois, and Washington to ensure delivery within 3–8 business days — so your garden upgrade plans never have to wait for the next planting season.

    Multi-channel availability: Anleolife products are available on Amazon, Walmart, Home Depot, Lowe’s, Wayfair, and the official website Anleolife.com, providing consistent quality assurance and dependable after-sales service no matter where you shop.

    Three complete garden scenarios: Planting (metal raised garden beds, soil systems), Raising (chicken coops, rabbit hutches), and Beautification (decorative accessories, pathway systems) — meeting every need from functionality to aesthetics in one connected product ecosystem.

    We understand that an ideal garden isn’t built overnight — it’s grown intentionally, one bed at a time. Anleolife’s modular design philosophy allows you to start with a single 8×4 ft or 12×3 ft raised garden bed and expand into a fully integrated planting system as your confidence and ambitions grow. With a 20-year product lifespan, your investment in Anleolife is an investment in decades of harvests, fresh food, and garden joy. We grow with you every step of the way.


    References

    1. National Gardening Association. “Garden to Table: A Guide to Food Gardening in America”.
      https://garden.org
    2. University of California Agriculture and Natural Resources (UC ANR). “Raised Bed Gardening”.
      https://ucanr.edu/sites/MarinMG/files/134381.pdf
    3. Penn State Extension. “Vegetable Gardening: Spacing and Planting Guide”.
      https://extension.psu.edu/vegetable-gardening
    4. Oregon State University Extension Service. “Raised Bed Gardening”.
      https://extension.oregonstate.edu/gardening/techniques/raised-bed-gardening
    5. Rodale Institute. “Companion Planting Guide for Organic Vegetable Gardens”.
      https://rodaleinstitute.org

    Note: Planting guidelines and spacing standards may vary by region and variety. Always cross-reference with your local extension office or seed supplier for the most current recommendations.


    About Anleolife

    Anleolife is a leading outdoor garden solutions provider in North America, dedicated to offering a full-scenario product ecosystem for home gardening enthusiasts, covering planting, raising, and garden beautification. Since its founding, we have upheld our brand mission, “Made for Garden Life,” continuously innovating products and optimizing services to help hundreds of thousands of users upgrade their gardens, reconnect with nature, and enjoy a better garden lifestyle.


  • 世界,您好!

    欢迎使用 WordPress。这是您的第一篇文章。编辑或删除它,然后开始写作吧!